If you want to make significantly better beer, you need to focus on your brewing water chemistry. From water profiles to brewing salts, mastering this essential ingredient can take your beers to the next level.
Brewing water chemistry significantly impacts your beer’s flavor and mouthfeel. Just ask the guys from Brülosophy! They’ve been running experiments and determined that water chemistry really matters.
And let’s face it, beer is 90% to 95% water. So yeah, it’s freaking important!
Water chemistry can be confusing. But it doesn’t have to be. Ironically, this seemingly simple natural element is the most complex. The ins and outs of the brewing water can be simplified to allow you to experiment with your own finished beers. Or, you can nerd out on the science. It’s up to you!
What’s Your Brewing Water Source?
The first thing you need to do before you start messing with salt additions is to get a base mineral profile of the water you’ll use for your beer. There are three main water sources you can choose from:
- Tap water (municipal water): This is the water in your home and contains a base amount of minerals from your local water reservoir.
- Spring or bottled water: This is water you can buy at the grocery store and contains a base amount of minerals.
- Distilled water or RO (reverse osmosis) water: This is water stripped of all minerals resulting in pure H2O.
Distilled or RO water is like working with a blank sheet of paper. It contains no minerals so you can build your water profile from scratch. If you’re working with this type of water, you can skip down to adding brewing salts.
Spring water contains minerals, just like tap water, so if you want to build a water profile, you’ll have to contact the bottler to learn the existing mineral content. However, if you plan on using tap water, you have three options to learn the mineral profile.
1. Get a Water Report From Your Local Municipal Water Source
Contact your local water treatment facility, and ask for the most recent water report. Let them know you’re using the water for homebrewing.
Some places even have special reports for brewing water they’ll email you on a regular basis. This is especially true if you have a lot of craft beer brewers in your town.
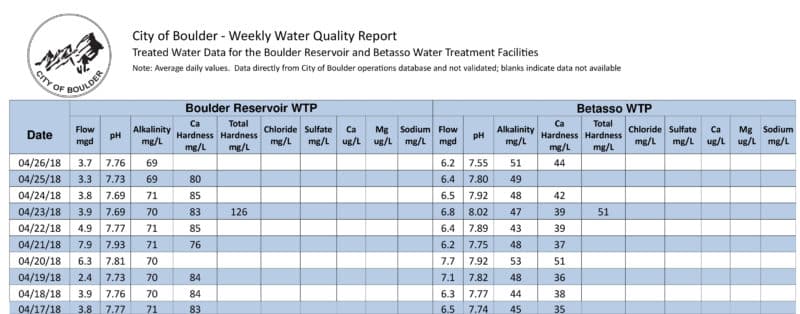
Above is an example of a water quality report I was emailed every week from the city of Boulder, Colorado. Just remember that reservoirs can change and the chemistry can change as it travels through to your home. That’s why I recommend also getting you water tested.
2. Get it Professionally Tested
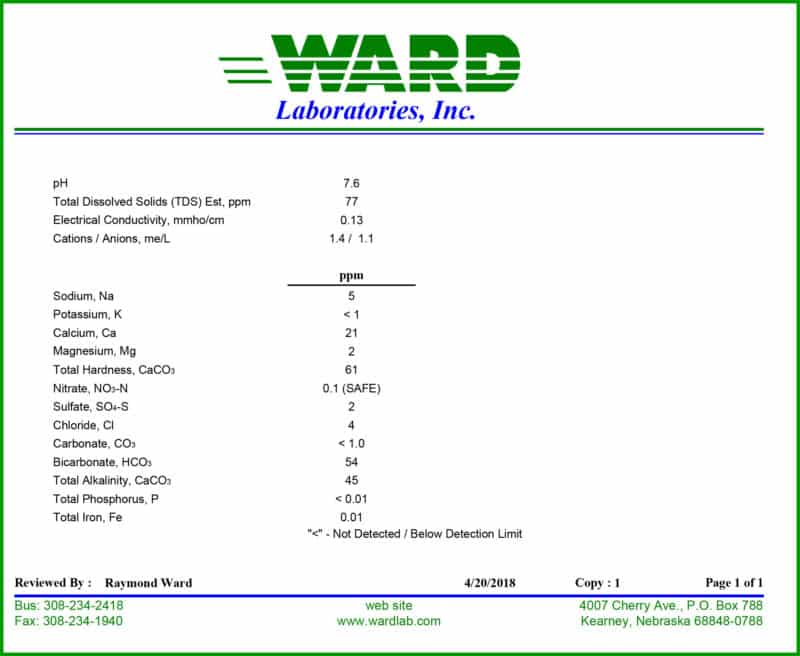
Send a sample of your water to a company like Ward Labs. For about $30, they’ll send you a test kit that includes a water sample bottle.
You run your tap water from the source where you’ll actually get your brewing water for about five minutes. Then, collect the sample and ship it back to the lab for analysis. The cost of the kit also covers the shipping. In about a week, you’ll receive a water report like the one below.
3. Test The Water Yourself with a Brewing Test Kit
You can buy a home water test kit specifically for brewing from LaMotte. But to be honest, I recommend getting it professionally checked and contacting your local water municipality first.
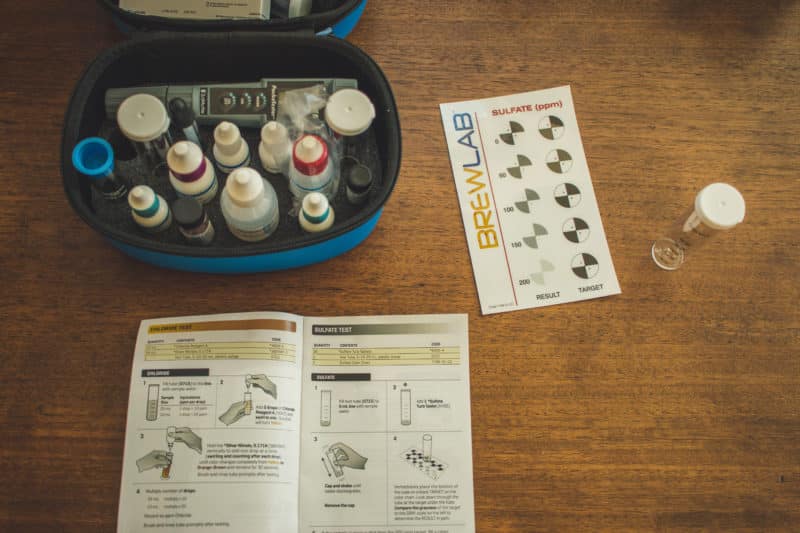

Great for doing at-home water tests specifically for brewing beer. We've tested this product and it works perfectly!
What’s in Your Brewing Water?
Whether you have it professionally tested, or use a test kit to do it yourself, you want to be on the lookout for certain ions and minerals in the water.
- pH
- Alkalinity (HCO3)
- Sulfate (SO4)
- Chloride (Cl)
- Calcium (Ca)
- Magnesium (Mg)
- Sodium (Na)
1. pH and Alkalinity
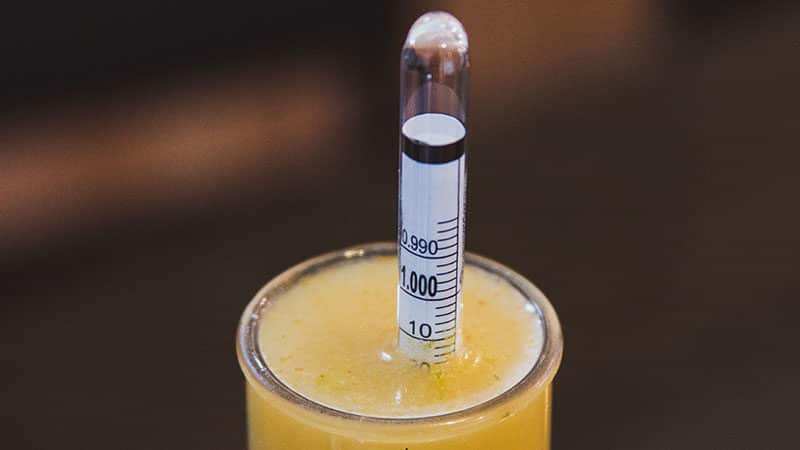
The measurement of your water’s acidity or basicity is its pH. It’s measured on a scale from 1 to 14, with 7 being neutral. Lemon juice is acidic and has a pH of around 2. Baking soda is basic and has a pH of about 9.
The best example of neutral pH is your tears. When you cry, your eyes don’t burn because they are perfectly pH balanced.
Knowing your starting pH is important if you practice all-grain brewing. Your mash pH should be between 5.2 and 5.6—yes, just a little acidic. A mash pH around 5.2:
- Helps convert starches to sugars (improving mash efficiency).
- Improves yeast health.
- Fights bacteria growth during fermentation.
- Better hop extraction.
- Better flocculation of proteins during the cold break and after fermentation is complete.
- Reduces chill haze in the finished beer.
If the mash pH is too high, you can extract tannins and bad flavors from your mash. Too low, and you have a tart beer.
What about alkalinity? You can think of alkalinity as pH’s bodyguard. It’s a buffer. So if you have a ph of 7.6 (typical for drinking water) and a high alkalinity reading of 125 parts per million (ppm), it’s gonna take a lot more acid to bring down your pH because the alkalinity is protecting it.
2. Sulfate and Chloride
These are the two biggest measurements when building your water profile. You might have heard the phrase “chloride to sulfate ratio.” This is the amount of chloride vs. sulfate in your water.
An oversimplification is:
- The more chloride, the more malt flavors shine. Enhances fullness and malt sweetness (thick mouthfeel).
- The more sulfate, the more hops bitterness shines. Produces a drier or crispier beer (thin mouthfeel).
3. Other Important Brewing Water Minerals
Calcium and magnesium determine how hard the water is. The more of those minerals, the harder the water is. Hard water enhances yeast flocculation, hot break, and prevents beer stone.
Sodium is salt. It rounds out the malt flavors. But too much, and your beer will taste salty. Nothing wrong with that if it fits the style (Gose), though.
Ready to improve your all-grain brewing process and dial in your system?
This video course covers techniques and processes for water chemistry, yeast health, mashing, fermentation temperature, dry-hopping, zero-oxygen packaging and more!
Click Here to Learn More
Using Brewing Salts to Help Water Chemistry
To build your profiles, you want to keep a handful of chemicals and salts on hand.
- Potassium Metabisulphite (Campden Tablets): eliminates chlorine or chloramines in your water. You only need about 500mg for 10 gallons (39 liters). It’s also known to help with cold-side oxidation. And winemakers use it to stop yeast activity for back sweetening.
- Gypsum (calcium sulfate): increases calcium and sulfates. It’ll also slightly lower mash pH.
- Calcium Chloride: increases calcium and chloride. It’ll also slightly lower mash pH.
- Epsom Salt (magnesium sulfate): increases magnesium and sulfate. Make sure you get the food-grade variety with no additives.
- Non-Iodized Table Salt (Kosher or Sea Salt): increases sodium.
- Baking Soda (sodium bicarbonate): increases alkalinity and mash pH while adding a touch of sodium.
- Chalk (Calcium Carbonate – CaCO3): increases alkalinity and mash pH while adding a touch of calcium. I recommend using baking soda over chalk because it dissolves better in water.
- Lactic Acid or Phosphoric Acid: decreases mash pH.
Depending on your water and what type of beers you brew, you might not need all of these things. But to be honest, they’re cheap and easy to keep around the home brewery.
Luckily, we don’t have to wrack our brains trying to figure all this out because we have tools to do these complex calculations.
Tools for Making Brewing Water Chemistry Adjustments
If you’re a serious homebrewer who wants to make a great beer, you need tools to help you be precise with your measurements.
High-Quality Digital pH Meter
To measure your mash pH and make sure you’re hitting 5.2 to 5.6, you need a high-quality digital pH meter. “Test strips are for amateurs,” according to Water: A Comprehensive Guide for Brewers by John Palmer and Colin Kaminski.
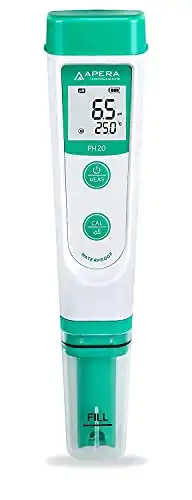
This is the perfect pH meter for homebrewers. It's affordable and comes in a rugged carrying case with pH calibration solutions. It also has automatic temperature compensation (ATC) that ensures accuracy in various temperatures. Up to 2,000 hours of continuous operation, which is more than enough and will last a lifetime. Plus, it's powered by AAA batteries.
But not all pH meters are the same. You need a good one that can measure pH quickly at any temperature and has dual calibration for the best accuracy.
To use your pH meter, after you’ve been mash resting for about 15 minutes, you can either take a wort sample or dip the pH meter right into the top of the mash to get a reading. Again, your goal is to have a mash pH between 5.2 and 5.6. If the mash pH is high or low, you can make chemical adjustments.
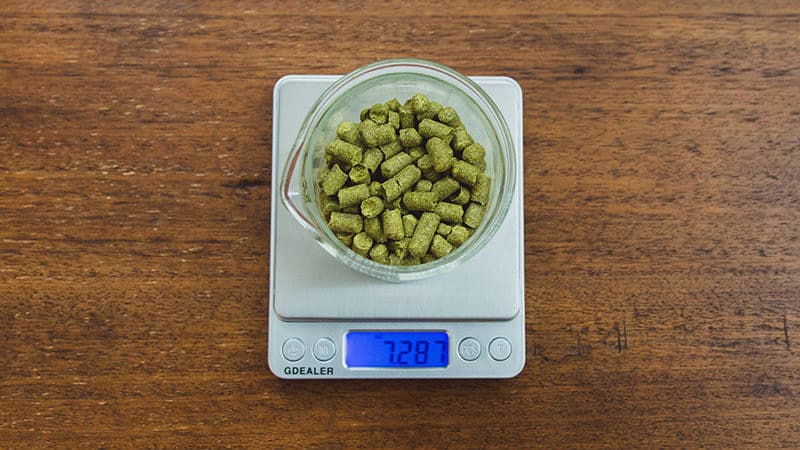
Jewelry Scale
You need a small scale that measures in grams as accurately as possible, so a jewelry scale is perfect for measuring your brewing salts. For instance, you only need about 500mg (or ½ gram) of potassium metabisulphite to remove chlorine/chloramines from 10 gallons of brewing water.
This scale will also come in handy for measuring hops in grams and ounces.
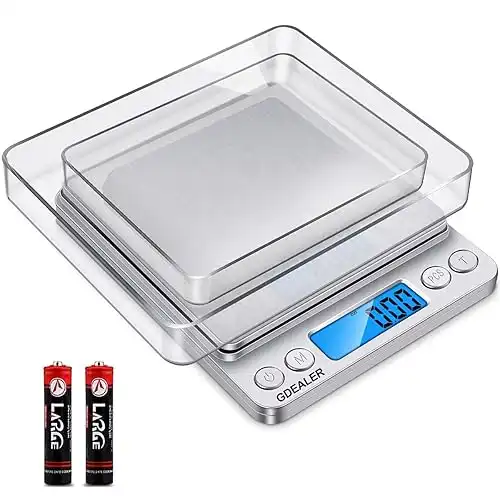
This scale is perfect for measuring hops, minerals, brewing salts, and other small amounts. It's super accurate and feels like it never runs out of battery power.
Calibrated Glass Medicine Dropper
This tool is optional, but it allows you to measure liquid down to the quarter milliliter. This is important for dosing out liquid acid additions for lowering your mash pH. You could also use a teaspoon and just re-test the pH after each addition.
Or you could use software to help you calculate exactly how much acid you need.
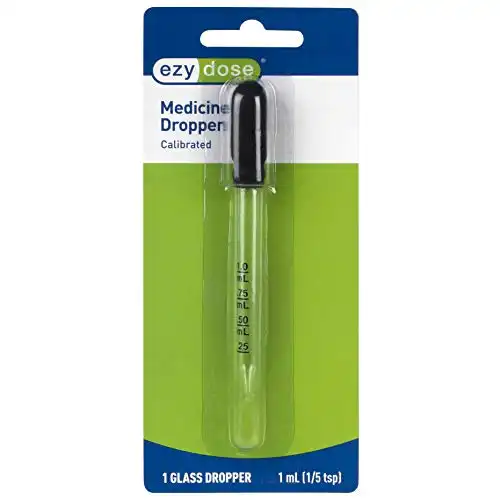
A simple dropper to dose your strike water or mash with acid to control mash pH.
Software for Brewing Water Adjustments
Some are free, some cost, but all will save you a lot of math and headaches.
BrewFather (Free & Paid Versions)
A new web-based app has hit the brewing scene to create and track recipes. It’s called BrewFather. It’s an all-in-one solution for homebrewers to develop recipes including water chemistry profiles. And it separates recipes from batches, which is one of the best parts of the software.
Not to mention again that it’s web-based. That means you don’t have to download any software to use it on your computer or smartphone. Everything updates across the board in real-time.
Honestly, this is a game-changing app for homebrewers. It is highly recommended!
A web-based app that lets you create and manage your homebrew recipes and keep track of the details in your batches and your ingredients inventory.
Bru’n Water (Free)
This is a free spreadsheet developed by Martin Brungard, a “civil and environmental engineer with extensive experience in the fields of water resources and geotechnical engineering.” It’s clear the guy knows his stuff.
You need to know your existing water profile and your grain bill before using the spreadsheet to calculate mineral additions. It may be intense and a bit intimidating when you first open it, but don’t worry. Marshall at Brülosphy created a great video on how he uses it with Beersmith.
How to Add Brewing Salts and Chemicals to Water
Once you’ve measured your salts and chemicals, you can either add them before or after mashing. And “after mashing” can be as late as right before packaging.
This makes a difference in your estimated mash pH calculation. Certain salts like gypsum (calcium sulfate) will decrease the water’s pH, and you need to know that so you can accurately determine your mash pH.
While you can add salts and chemicals after you mash, it’s best to add all your salts to all the water you’ll use before mashing in.
Now, depending on your starting water profile and your mineral additions, you may need to add some liquid acid to bring down the water’s pH to hit your target mash pH of 5.2 to 5.6. Or you may need to add baking soda to bring it up. You can use brewing software to help you do this before you mash in.
Fifteen minutes into your mash rest, use your pH meter to see if you’ve hit your 5.2 to 5.6 pH target. If not, you can use your scale or medicine dropper to add chemical additions to correct the pH. If your pH is low, you can add baking soda to increase the pH. If your pH is high, you can add lactic or phosphoric acid. Be sure to add small, incremental doses while stirring and constantly measure the pH, so you don’t overshoot.
Getting your mash pH in this range is one of the most important things you can do for your beer.
Note: Most brewing salts dissolve into cold water quickly except calcium chloride. If you’re adding brewing salts to cold water, you’ll need to do a lot of stirring to ensure all the salts are fully dissolved. You can avoid this excessive stirring by adding salts while your strike and sparge water are heating up. Warm water will dissolve these salts more easily.
WARNING: Always add salts or chemicals to water. Never add water to salts or chemicals. Safety first!
What Brewing Water Profile Should You Try to Match?
Brewing software usually has built-in lists of different target profiles depending on the style of beer you want to brew. You can also check out this list for some of the most popular ones.
Keep two general principles in mind when digging through these lists.
- If you want a bitter bite, like a classic west coast IPA, you’ll want more sulphate and less chloride.
- If you want a malty smoothness, you’ll want more chloride and less sulphate (this is a popular choice for Juicy/Hazy IPAs).

If you're interested in brewing Hazy or New England IPA (NEIPA), then you need this book handy in your library. It'll be filled with highlighter ink before you know it!
There’s one more thing to be aware of. If you’re trying to brew a classic style or a style based on a region, beware targeting the water profile of that time period or place. For example, if you want to make a Pilsner, you shouldn’t base your water profile on Pilsen. Even back then, brewers were making water adjustments. So to blindly copy the water profile of a specific city or region is ludicrous.
Fellow homebrewer Micheal Tonsmeire advises to “[base your water profiles] on personal taste and recipe, not history and tradition.”
Happy Brewing!
Additional Resources
- Water Adjustment by TheElectricBrewery.com
- Water: A Comprehensive Guide for Brewers (affiliate link) by John Palmer and Colin Kaminski
- Mouthfeel Softness by Scott Janish (also, you should pick up his new book about New IPAs)
- Brewing Water by Mike Conant
- Using Salts for Brewing Water Adjustments by John Palmer