So you’re done with small batches on your stovetop. Or maybe you’re jumping into homebrewing as way to get good beer and spend more time outdoors. Or waiting for your massive kettle to boil is slowly draining you of your sanity. Whatever your reason, you find yourself in need of a good propane burner.
You can find a good burner online, at your local camping or hardware store, and even at homebrew supply outlets. But how do you find the best propane burner for your homebrew kettle? You just need to understand what to look for, and how to get started if you’re new to burners.
Why a Propane Burner? Why Not a Campfire?
Theoretically, you could suspend your brew kettle over a cozy campfire and brew your beer the way they did in the Middle Ages. While that might be a fun experiment for a medieval ale recipe, the problem is, you won’t be able to control the flame or the heat.
A propane burner gives you that control so you don’t have a wort boilover, and there are no messy ashes to clean up afterward. Plus, it burns much cleaner than wood, so it’s better for the environment. It’s an all-around win-win.
Getting Started with a Burner
If you’re looking for a way to cut down on the amount of time it takes to get a big kettle boiling, a propane burner is the way to go. But these burners are finicky and take some serious practice.
Once you have a burner, carefully read the instruction manual before brew day to familiarize yourself with how to set up your model. You don’t want to be worrying about a new piece of equipment while dealing with a brew schedule.
Important: The manual will go into more detail, but generally you need to place the burner on a flat, stable surface in an open area. You want at least a ten-foot safety zone between your burner setup (this includes the propane tank) and any structures, trees, bushes, or anything else that may be flammable.
Important: Always place your propane tank upwind of your burner to prevent accidental ignition.
How to Test for Gas Leaks
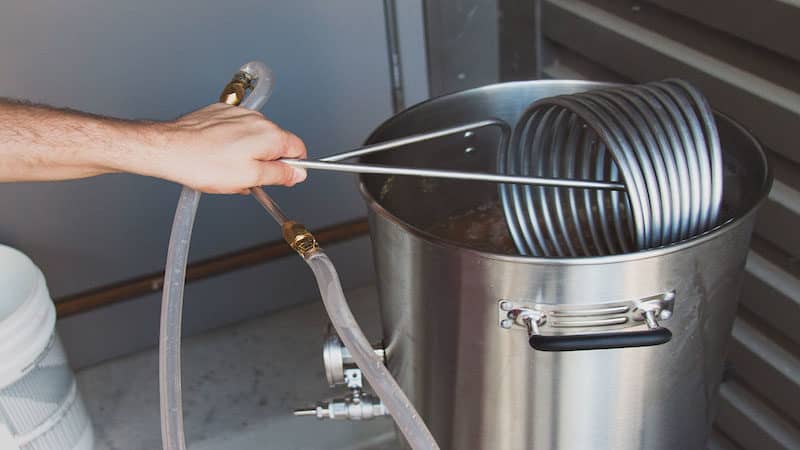
Once you have the hose attached, check that your valves are secure by performing a gas leak test. This will ensure no gas leaks out while you’re brewing.
- Close the regulator control valve to shut off the flow of gas between the tank and the burner.
- Open the propane tank valve to allow gas into the regulator line.
- Using a small brush or spray bottle, coat the valve connections by the tank and the burner with a mixture of dish soap and water.
- Examine your soapy connections. If you see any bubbles, you have a gas leak, and you need to tighten your fittings.
- Repeat the test until you don’t see any leaks.
- Turn off the tank valve once you’re certain you have no leaks.
- Wait at least five minutes before lighting your burner
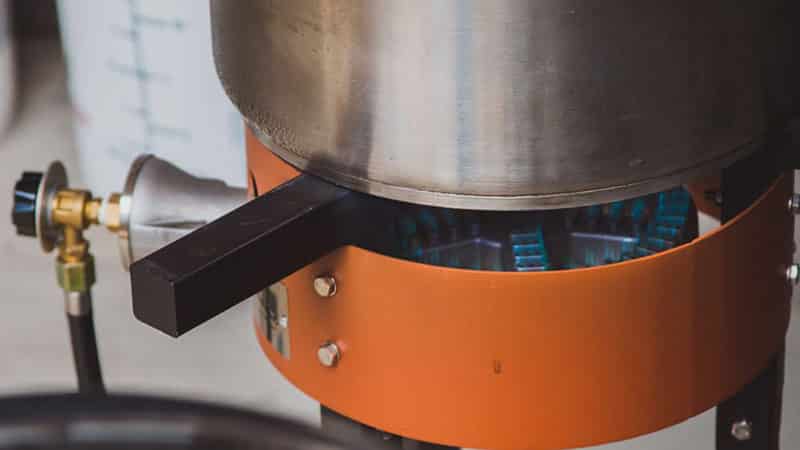
To light your propane burner, make sure all your valves are closed before starting. Open the tank valve fully, and just barely open your air control shutter. Strike your match and be prepared to light the burner from the bottom. Otherwise you might singe your fingers. To keep your fingers even safer, use a long-handled lighter.
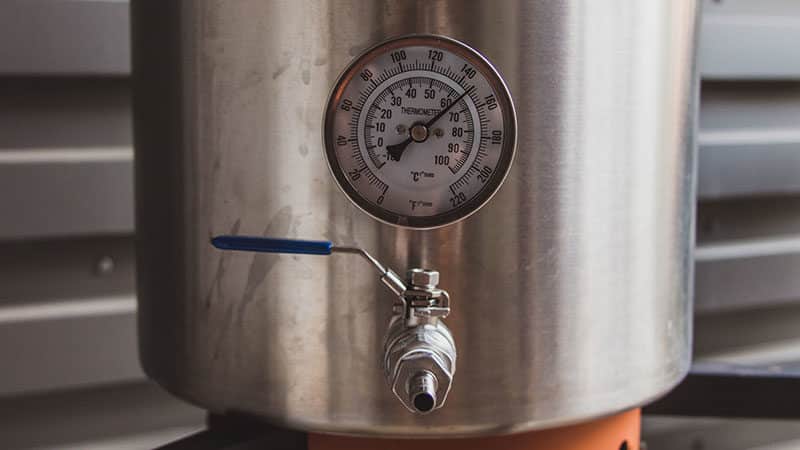
Once your match is ready, slowly open the burner’s regulator valve until it ignites. Once it’s lit, adjust the air shutter and the regulator valve to strengthen and heighten the flame. Remember, you want blue flames like you would see on a gas stovetop.
When in doubt, always refer to your owner’s manual. A manufacturer-recommended setup is a safe setup.
Ready to improve your all-grain brewing process and dial in your system?
This video course covers techniques and processes for water chemistry, yeast health, mashing, fermentation temperature, dry-hopping, zero-oxygen packaging and more!
Click Here to Learn More
Burner Safety Tips
You need to be extra careful when gas and fire are involved. Keep your kettle, your brew day, and yourself safe by:
- Doing a gas leak test before lighting your burner, especially if you’ve moved it or taken it apart for storage.
- Never using a propane burner inside or under a roof or overhang.
- Keeping your burner away from flammable or combustible surfaces and materials.
- Wearing heat resistant gloves, long sleeves, pants, and closed-toe shoes.
- Allowing your unit to cool for at least two hours before touching it.
- Using common sense. If it sounds like a bad idea, it probably is.
All About That BTU
You’ll notice propane burners often come with a measurement that says something like “60,000 BTU.” Aside from a ton of zeroes, it doesn’t tell you anything if you don’t understand what the heck a BTU is in the first place.
A BTU is a British Thermal Unit, which is the amount of energy needed to raise the temperature of one pound of water by 1°F. Burning wood, for example, gives off roughly 8,000 to 10,000 BTUs in an hour.
To get a proper boil with a propane burner, you need to make sure the burner can handle your brew kettle capacity without causing a boilover. If you’re doing a two-gallon boil with a 200,000-BTU burner, you run the risk of overheating your wort if you aren’t watching your kettle carefully.
The higher the BTU rating, the faster your kettle will heat. Just keep in mind that propane burners don’t perfectly transfer heat with 100% efficiency. The actual time it takes for your water to boil depends on your starting temperature and the weather.
You can try to calculate how many BTUs you need with a little math (and a ton of estimation). Or you can skip to the pre-calculated estimates.
Remember that a BTU is how much energy is required to raise the temperature of one pound of water by one degree. Just one tiny problem: we don’t usually measure water (or liquids in general) in pounds. That’s because the weight of liquid changes based on its density.
Luckily, we don’t have to do any crazy math to convert gallons of water to pounds. Someone already did it for us. One gallon of water is roughly 8.35 pounds. Just multiply the two to covert.
EXAMPLE SOLUTION: 5 gal × 8.35 lbs = 41.75 lbs
Note: Technically this is called dimensional analysis, and the proper equation above should be 5 gallons × (8.35 lbs ÷ 1 gallon) to cancel out the gallons unit. Really, this is only important if you like to add extra numbers or have more units to worry about.
Once you convert your gallons to pounds, we can start calculating the BTUs. The next step is to calculate how many BTUs it will take for your water to boil. Boiling starts at 212ºF (unless you’re at altitude), so just subtract an average starting temperature from your boiling point. Or you can use a specific one. Whatever you want to do.
EXAMPLE SOLUTION: 212ºF − 75ºF = 137ºF
We then put the last two equations together to figure out how many BTUs you need to get your water boiling. This is done by multiplying the pounds of water by the change in temperature.
EXAMPLE SOLUTION: 41.75 lbs × 137ºF = 5,719.75 BTUs
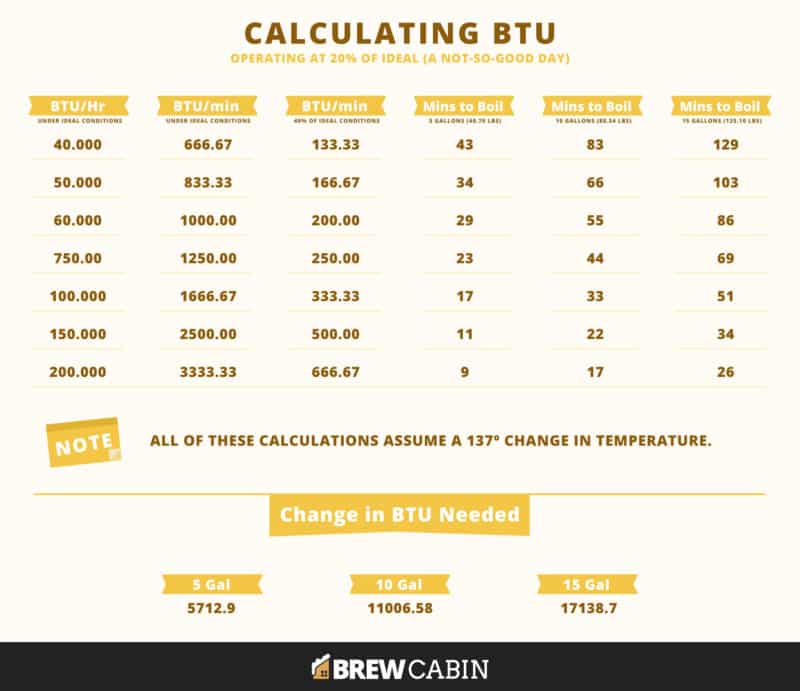
When propane burners list the BTUs they produce, they’re actually talking about how many BTUs the burner can produce in an hour. But the point of the burner is for boiling a big pot of water to not take an hour, so we want to look at the BTUs per minute. Simply divide the potential BTUs by 60.
EXAMPLE SOLUTION: 50,000 BTUs ÷ 60 min = 833.33 BTUs/min
You could at this point divide the number of BTUs you need to boil water by the number of BTUs produced per minute by the burner to see how long boiling would take. But we’re not going to, because there’s a minor snag we have to address first.
Remember that propane burners aren’t 100% efficient? Thanks to conditions like ambient temperature and wind, you probably won’t be looking at 50,000 BTUs even on a good day.
To account for this, let’s just assume your burner will operate at either 40% efficiency (on a good day) or 20% efficiency (on a not-so-good day). You can make this calculation by multiplying your BTUs/minute by an efficiency percentage.
EXAMPLE SOLUTION: 833.33 BTUs/min × 0.40 = 333.33 BTUs/min
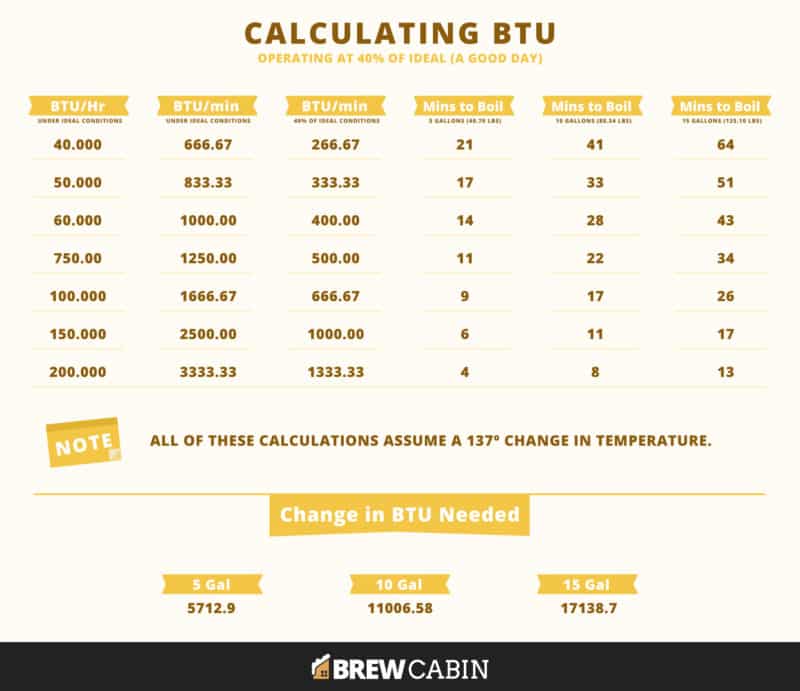
Assuming you start at 75ºF and your 50,000-BTU burner is operating at 40% efficiency, it should take around 17 minutes for 5 gallons of water to boil. That’s a little more reasonable.
Doing this check can also give you a good idea of how long you might be watching a pot of water boil on a bad day.
EXAMPLE SOLUTION: 833.33 BTUs/min × 0.20 = 166.67 BTUs/min
Now all you have to do is divide the BTUs required to make your water boil by the number of BTUs produced per minute by your hypothetical burner.
EXAMPLE SOLUTION: 5,719.75 BTUs ÷ 333.33 BTUs/min = 17 min
It’s not hard math, there’s just a lot of it.
About How Many BTUs Do You Need?
Remember, these are estimates.
- Five gallons or less: Between 40,000 and 75,000 BTUs
- Five to ten gallons: Between 75,000 and 100,000 BTUs
- Ten to 15 gallons: Between 100,000 and 200,000 BTUs
- 15 gallons or more: At least 150,000 BTUs, but optimally 200,000+ BTUs
Now it’s just a matter of choosing one that can provide the right amount of power for your brewing.
Propane Burners That Get the Job Done
Now that you know how much power you need, you can choose the right one for the job. Most of the ones you’ll find on the market are single burners, but some companies do make dual-burner models if you like to have more than one batch going at a time.
1. BrewBuilt AfterBurner
If you’re not taking chances with your klutzy, beer-mooching neighbor, the sturdy BrewBuilt AfterBurner is worth considering. It has a massive burner, and can produce between 70,000 and 100,000 BTUs depending on the setting.
The AfterBurner sits about two feet off the ground, so you can easily transfer your wort from the burner to a fermenter. It also comes with a windshield around the burner to protect your flame on windy days.

2. Camp Chef Propane Brewing Burner
Let your family or your roommates reclaim the kitchen. The Camp Chef burner can produce 60,000 BTUs. Like the BrewBuilt, the Camp Chef stands at 22 inches for easy transfer to a fermenter for cooling.
It also features a high-pressure regulator for more flame control, which can be really helpful in preventing boil overs.

3. Anvil Propane Brewing Burner
Got a little bit of an angle on your driveway? It doesn’t matter with the Anvil brewing burner. You don’t need a completely flat surface to get your brew on. Anvil’s legs are modular, so you can choose your burner’s height (either 7 or 16 inches, unless you get optional leg extensions for 24 inches).
It packs a bit of a smaller punch at 45,000 BTUs, but it can still get a quick boil going, especially if you do any small batch brewing.

This is the first outdoor burner I used for homebrewing and it's perfect for anyone just starting out or looking to step up their process. I recommend getting the leg extensions too.
4. Blichmann HellFire Floor Standing Burner
You want to talk about a crazy name? The Blichmann HellFire standing burning is a completely metal name.
It can handle kettles up to 20 inches in diameter, plus it comes with a clip-on heat shield to keep the valves cool during your boil.

5. GasOne Heavy-Duty Propane Burner
So you’re upping your brewing game, and you need some heavy-duty power. The cast-iron stand is welded together for extra durability.
In addition to a fully adjustable knob for flame control, the GasOne heavy-duty burner also has a pre-installed O-ring on the regulator to help prevent gas leaks.

6. GasOne High-Pressure Single Burner
Like their heavy duty burner, this high-pressure version from GasOne is just as sturdy as you would expect. This single propane burner packs 100,000 BTUs.
7. Bayou Classic Outdoor Gas Cooker
Need more than one burner? The Bayou Classic outdoor gas cooker comes in a three pack, if that’s what you need. Otherwise, the single burner will serve you just fine. At 57,000 BTUs, it’s perfect for smaller batch brews.
The Bayou Classic also includes a 48-inch hose to hook up to your propane tank, as well as brass control valve.
8. Concord Deluxe Banjo Burner
You probably don’t have a 200-quart kettle, but if you did, you could rest easy knowing the Concord Deluxe banjo burner can handle that weight. The Deluxe can generate 200,000 BTUs.
If you’re the kind of homebrewer who likes to stay neat and organized, you can detach the legs of the Deluxe for more compact storage.
9. Dark Star 2.0 Propane Burner
Another contender for the coolest burner name. You don’t need to assemble this 65,000-BTU burner and it can handle up to 125 pounds on its 17-inch burner diameter.
10. Edelmetall Brü Burner
It’s not just the 72,000-BTU capacity that sets the Edelmetall Brü burner apart. The precision is key here. The stays at the top of the burner can adjust to most kettle sizes.
Did we mention it was made with brushed stainless steel and copper finishes? Not only is it super functional, the Brü is a snazzy addition to your brew gear.
Better Than a Fire Pit
Propane burners might be a little scary to use at first, but they’re amazing brewing tools once you get used to using them. And if you’re a culinary adventurer in addition to a homebrew apprentice, you can use a burner to fry your next Thanksgiving turkey, smoke meat, or try your own crawfish boil.
Just remember: get the burner you need now, not the one you think you’ll need later. Stay safe and have a blast enjoying your outdoor brew day.
Happy Brewing!