You might not think homebrewing has much in common with enjoying a nice cup of tea. But as brew in a bag (also known as BIAB) homebrewers know, you can craft a delicious, high-quality beer with the same convenience as steeping a bag of tea.
If you’re looking for a cheaper, simpler way to try all-grain brewing, the brew in a bag method might be right for you. We’ll walk you through each step of the process, including the supplies you’ll need, making the correct calculations (like grain absorption rate) and the best techniques for brewing in a bag.
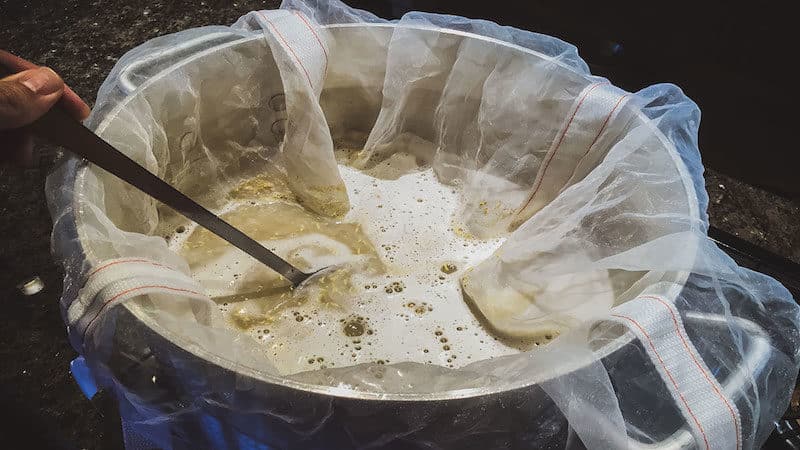
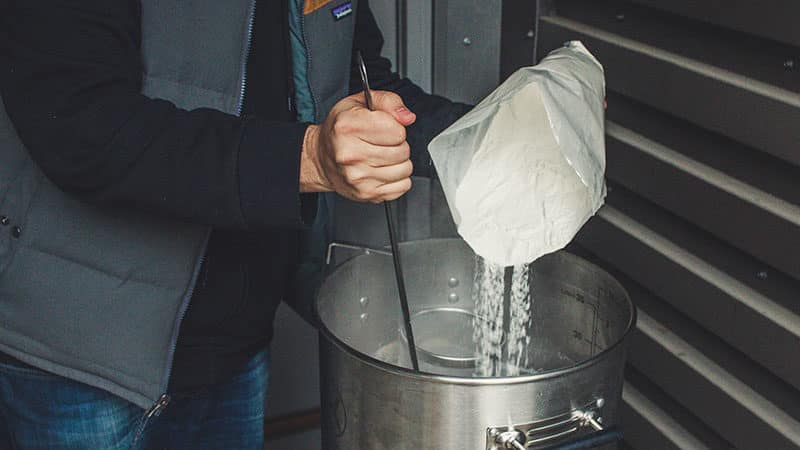
Photo credit: James Spencer of Basic Brewing.
NOTE: Pictured above is The Brew Bag®, which we recommend for any brew-in-a-bag homebrewer.
What is the Brew In A Bag Method?
The technical term for the boil in a bag method is all-grain, single-vessel, no-sparge brewing. All-grain brewing means you’ll be using crushed malts. The “vessel” in question here is the boiling pot—that’s our mug equivalent. The “no-sparge” bit means you can skip rinsing your grains, a process also known as lautering.
And as you’ve no doubt figured out, the “tea bag” is the bag you’ll use to steep your grains and create beer. You’ll still need to ferment the resulting wort, of course, and there’s some math involved when you’re setting up. But trust us—if you can make tea, you can brew in a bag.
An Easier Way to Homebrew
Whether you’re adding a new set of tools to your existing setup, want to try an alternative method of all-grain brewing, or are brand-new to homebrewing and want to keep things simple, the brew in a bag method makes it easy to get started.
Regardless of your preferred method, the goal when homebrewing is to transform grain, water, hops, and yeast into that nectar of the gods we call beer. The brew in a bag process has four essential steps:
- Transform the starches in your grain malt into sugars by mashing
- Separate the wort, or liquid portion of your brew, from the grain
- Add hops and boil the liquid to achieve the desired bitterness, and then cool
- Add yeast to transform the sugars in your brew into alcohol to create beer
Brewing in a bag simplifies this process by allowing you to do it with fewer steps and with less equipment than you’d need for a traditional homebrew, saving you time, money, and effort.
Ready to improve your all-grain brewing process and dial in your system?
This video course covers techniques and processes for water chemistry, yeast health, mashing, fermentation temperature, dry-hopping, zero-oxygen packaging and more!
Click Here to Learn More
Brew in a Bag Supplies
You don’t need much to go from zero to brew with this method. Armed with these few items, you’ll have everything you need to get your brew ready for mashing. You’ll need:
1. A Brewing Bag
Surprise, surprise: you need a bag to make a brew in a bag beer! If you’re really into the DIY spirit, you can also find designs online to make your own brewing bag from voile fabric or nylon. However, we’d rather trust the experts, and there are several affordable, reusable pre-made brew bags options on the market.
We recommend The Brew Bag®. Not only is this an easy-to-use, reusable, high-quality bag, but it comes in a variety of sizes made to fit any kettle.
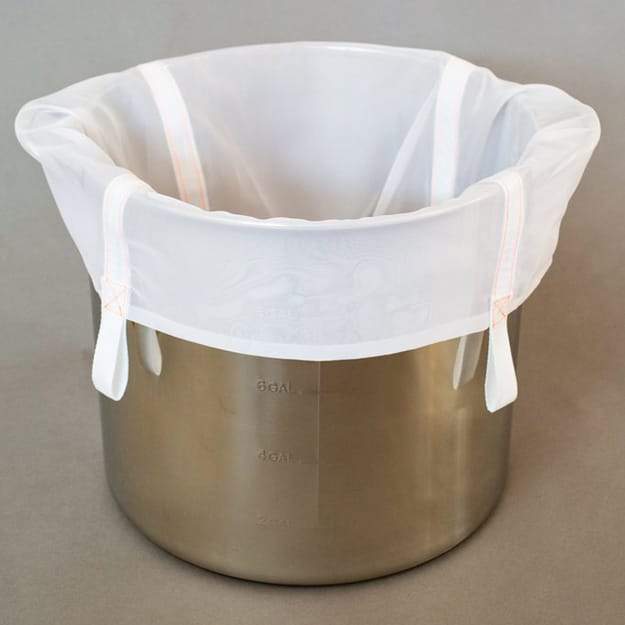
A well-designed fabric filter bag to use in all mash tuns and brew kettles.
Whatever bag you choose, be sure it’s sized to fit into the kettle without touching the bottom during the boil. Direct contact with the hot metal can scorch your grains or even melt your bag! We’re betting that won’t make for a tasty beer.
2. A Large Brew Kettle
Because the brew in a bag method uses just one vessel for mashing and boiling, you’ll need to get yourself a larger brew kettle than you would if you were planning to do a traditional multi-vessel brew. Remember you need to have enough room for your pre-boil recipe as well as the volume of wort you’ll be boiling to transfer to your fermenter after chilling. That means you’ll need a 15-gallon brew kettle to accommodate a full 5-gallon batch of brew in a bag beer.
We recommend the Ss BrewTech 15-Gallon Electric Kettle. It’s large enough to accommodate the brew in a bag method and the stainless steel will last a lifetime. It’s also a great kettle to own if you want to try different homebrewing methods in the future.
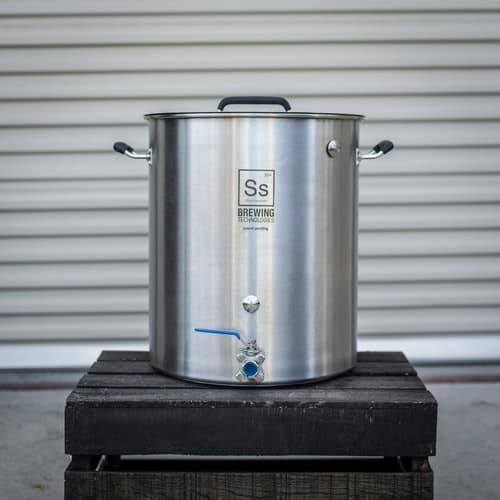
These kettles by Ss Brewing are a premium lineup of feature-rich all Stainless Steel Brew Kettles.
3. Brewer’s Gloves
Safety first! You’ll need a trusty pair of brewer’s gloves to protect your hands and forearms while you’re handling the hot brew kettle or for when you need to squeeze the brew bag to help drain the wort.

4. A Thermometer and a Hydrometer
A trusty homebrewer’s thermometer will help you make sure you hit your target mash temperature. If you’re going to spend all that time calculating things like strike temperature and grain absorption rates, you’ll want to make sure you’re measuring your temperatures accurately! You’ll also need a hydrometer for testing the original and final gravity of your beer.

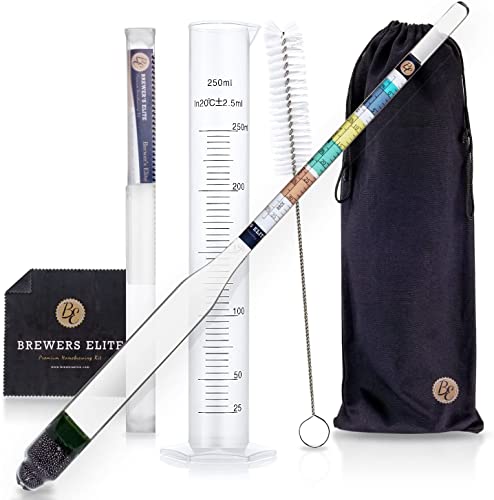
This Brewer's Elite Triple Scale Hydrometer & 250ml Test Jar - Combo Set is the perfect tool for any homebrewer. Our durable all-glass design makes it easy to read, and our graduated color bands help you know when your brew is ready. Plus, our Crystal clear fonts are so easy to read.
5. Blankets, Old Mats or Other Insulation
You’ll want to have insulative materials (like blankets) on hand to wrap around your kettle during mashing. You can also use your oven or outdoor electric smoker to hold the kettle while it’s resting
6. Leverage to Lift the Bag from the Kettle
You’ll need a sturdy way to lift the bag from the kettle for draining. You could simply hoist it out of the kettle to let the excess wort drain, but we recommend a tripod, an A-frame ladder, or even a simple pulley system to make lifting the bag easier—and safer!
7. All-Grain Beer Recipe and Ingredients
Most standard all-grain recipes will work for the brew in a bag method. Pick out a recipe you’d like to experiment with and make sure you have all the ingredients on hand.
Now you’re ready to brew in a bag!
Step-By-Step Process for Brewing in a Bag
1. Preparing Your Brew Grains
As with any other style of brewing, the first thing you want to do is clean and sterilize all your equipment. Because this is an all-grain brewing method, you’ll also need to make sure you have your grains pre-crushed and ready to mix.
Crushing the grains will ensure they’re open and ready to have their starches released and transformed into sugars. Your supplier can usually handle this for you, unless of course you’re a little more hardcore and have also learned how to crush your own malts.
2. Calculating Your Brew Batch
Once you’ve gathered your supplies, you’re ready to get started. But first, you’ll need to run a few calculations.
Note: If just the idea of doing math makes your brain cramp, you can use a BIAB calculator like this one, and then skip to the next step in the process. And if you need to convert to metric, simply use these conversions: 1 pound = 0.45 kilograms, 1 gallon = 3.78 liters.
What is Original Gravity (OG) and Final Gravity (FG)?
The first two particular numbers you’ll need are original gravity (OG), which refers to the specific gravity of your mash before it’s been fermented, and the target final gravity (FG), which is the specific gravity of your finished beer. In homebrewing, specific gravity is used to help measure sugar concentration and, by extension, the qualities of the beer produced by a given amount of sugar.
Your FG is always lower than your OG, because the yeast added during the fermentation process will have eaten up most of the sugar in the wort. Sugar is denser than water, but once it’s converted to alcohol, it’s less dense than water.
How Much Strike Water Do I Need?
Unlike traditional brewing, the brew in a bag method does not use the homebrewer’s standard of 1 to 2 quarts of water per pound of grain. Instead, you’ll calculate the volume of strike water, which is simply a name for the water that gets added to your grains to create your mash, based on the desired volume of your wort.
To calculate strike water volume, you need to know three variables:
- Total Grain Weight, or the amount of grain you’re using.
- Grain Absorption Rate, or the rate at which the grain absorbs water. The homebrewer’s rule of thumb for grain absorption is between .1 and .125 gallons per pound of grain.
- Boil-Off Rate, or the rate at which water boils away on the heat source you’re using. Your boil-off rate will vary, but should be easy to track after a few brews if you don’t already know it from previous boils.
Example of Calculating Strike Water
Let’s say your recipe calls for a finished batch size of 5 gallons of beer. Using those three variables, you can find your pre-boil volume or the total volume of wort you need to boil to produce your five-gallon batch of beer. Our variables are set as follows:
- Total Grain Weight: 12.5 lb
Grain Absorption: 0.1 gallons per pound of grain
Boil-off Rate: 1 gal per hour
Batch Volume: 5 gallons
Boil Time: 1 hour
To find our pre-boil volume, we just need to plug them into the following formula:
T x B + V = P
- T is the Boil Time (hours)
- B is the Boil-Off Rate (gallons per hour)
- V is the Batch Volume (gallons)
- P is the Pre-Boil Volume (gallons)
Which gives us: 1 x 1 + 5 = 6. We’ll need a pre-boil volume of six gallons to brew five gallons of beer.
Now that we know our pre-boil volume, we can calculate our strike water volume, which uses the following formula:
A x G + P = SV
- A is the Grain Absorption Rate (gallons/pound of grain)
- G is the Total Grain Weight (pounds)
- P is the Pre-Boil Volume (gallons)
- SV is the Strike Water Volume
Giving us: .1 x 12.5 + 6 = 7.25. We’ll need to add 7.25 gallons of strike water to our grains to brew our 5-gallon batch of beer.
How Do You Calculate Strike Water Temperature?
Another important factor you’ll need to manage during the brew in a bag process is temperature. Your target mash rest temperature is the value specified for your mash while it rests before you remove the bag and proceed to the boil.
A good rule of thumb to follow for determining how hot your strike water should be is to add between 8°F and 12°F (between 4.4°C and 6.6°C) to the desired mash rest temperature.
For our example, let’s say the recipe calls for a 60-minute mash rest at 153°F (67.2°C). Following our rule, the strike water should be heated to between 161°F and 165°F (between 71.6C and 73.8°C).
Staying in the target range for your brew is important because it helps your grains release the sugars that will feed the yeast that turns your wort into delicious beer!
3. Making the Mash
Now that you have all the information and materials you need, it’s time to brew. The first thing to do is to get the mash ready and allow it to rest.
- Add the strike water you calculated from your recipe to the kettle.
- Heat it to the target temperature.
- Add the brew bag to the kettle and secure it with clips, bungee cords, etc., to prevent it from touching the bottom of the kettle. Be sure to wear brewer’s gloves!
- Add your ground malted grains to the bag; stir and cover.
- Use a thermometer to make sure you hit the target mash temperature. If you need to adjust it, you can add ice to cool things down, or add more hot water to increase the temperature. You can also turn on the burner for a bit to raise the temperature.
- Remove the kettle from heat and wrap in the insulation of your choice.
- Important: We recommend moving the kettle away from the heat source. But if you decide to insulate in place, keep anything flammable away from the base of the kettle and triple-check you’ve turned off the heat.
- Allow the kettle to rest as specified in the recipe you’re using.
If possible, resist the urge to check the temperature until the end of the rest, as this will help your mash conserve its heat.
4. Hoisting the Brew Bag
Once the timer goes off and you’ve unwrapped your rested mash, check the temperature and make sure you’re within the target range. Slight variations of up to 4° are normal, so don’t panic if the temperature has dropped.
Now you can lift the bag and allow it to rest on the hook or hoist or whatever device you’ve selected to hold up the bag while it drains, which should take about 15 minutes. You can speed up the drain by putting on your brewer’s gloves, grabbing a friend, and gently squeezing the bag to encourage the extra wort to flow into the kettle. It’s kind of like squeezing a tea bag, only with two people and light industrial equipment.
Once the drain is complete, you can dispose of the grains simply by carrying the bag to the garbage can and giving the bag a shake. Your spent grains also make an excellent addition to your compost pile.
Rinse the bag out thoroughly and set it out to dry, or if you’re adding hops during the boiling stage rather than dry-hopping your beer, give it a rinse and use it to hold your hops.
It’s also time to test the OG of your wort at this stage. For this, you’ll use a hydrometer. Try to stay within plus or minus .05 of the target value.
If the specific gravity is too low (i.e., too much water to sugar in the ratio), you can boil off some liquid to raise it, then test it again. If it’s too high (i.e., too much sugar to water in the ratio), you can add some water to lower it. Or, if you’d like, leave it alone and give your brew a little extra kiss of alcohol. We promise not to tell!
Note: When you’re adding hops, remember they will increase the bitterness of your beer the longer they’re boiled. So if, for example, you test the OG of your homebrew before boiling and it’s too low, let evaporation reduce the volume of your wort to the correct level and then add your hops and boil as directed by the recipe for your particular beer style.
This Brewer's Elite Triple Scale Hydrometer & 250ml Test Jar - Combo Set is the perfect tool for any homebrewer. Our durable all-glass design makes it easy to read, and our graduated color bands help you know when your brew is ready. Plus, our Crystal clear fonts are so easy to read.
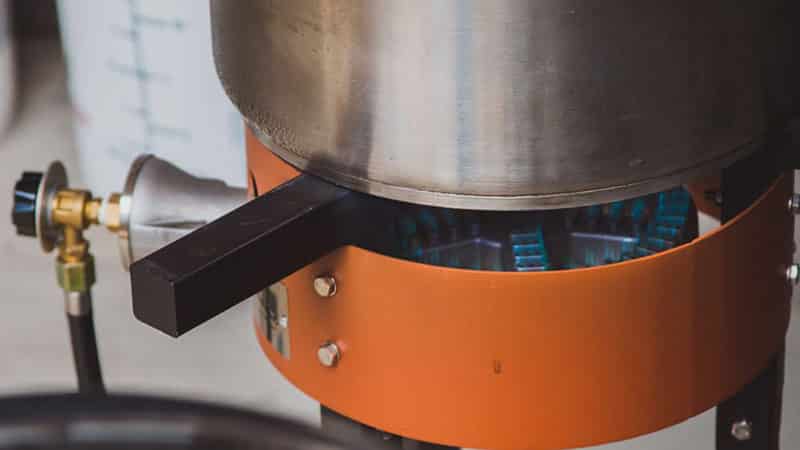
5. Boiling Your Brew
With your wort ready to roll, it’s time to heat things up once more. Boil your wort for 60 to 90 minutes, as directed by the recipe you’re using. Add hops when desired or as directed.
If you’re adding the hops to the boil and reusing the brewing bag to do so, be sure not to let it touch the bottom or sides of the kettle to avoid scorching. If you used a tripod or pulley hoist to suspend your bag, you can use it again here to keep the bag away from the kettle’s interior.
Alternatively, use a hop spider to keep things tidy and scorch-free.

Keep hop debris from clogging up your ball valve with our recommended hop spider for deep brew kettles.
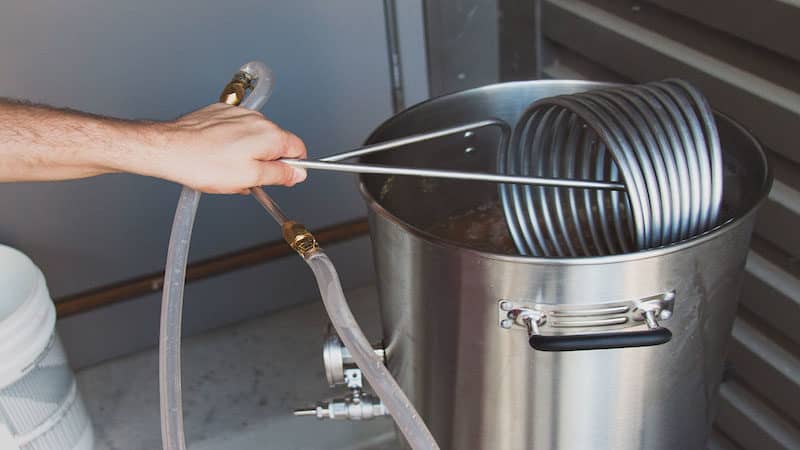
6. Cooling and Transfering Your Brew in a Bag Beer
When you’ve finished the boil, your brew in a bag is complete. Kill the heat, remove your hops, and that is that. All that’s left is to cool your wort and transfer it to the fermenter of your choice for what may be the only hard part of this and any brew: waiting for your beer!
The thing we love the most about the brew in the bag method is its accessibility. It doesn’t matter if you’ve brewed a thousand batches or are just starting out—if you want to brew beer, this approach makes it easy.
So grab your supplies, pick out your favorite grains, and polish up that kettle. Chances are, your next great beer is in the bag.
Happy Brewing!