If you’re looking to add more hop flavor and aroma to your homebrew, then you need to learn about dry hopping. This guide covers every dry-hopping technique in the brewing process, including low-tech and advanced like the pro brewers.
With a few simple tools, your favorite hops, and the right timing, you can get the same flavors and aromas the pros enjoy in their beers.

What is Dry Hopping?
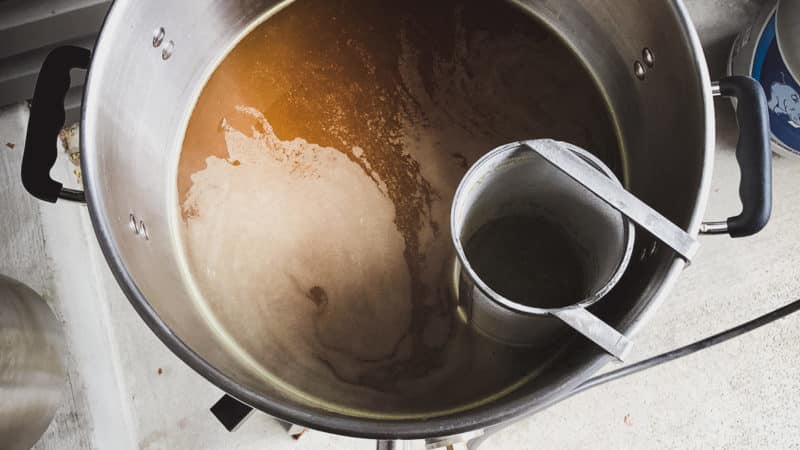
The trademark bitterness that gives most beers their bite comes from hops. And traditionally, that bitterness is added by tossing hops into the wort while it’s still in the brew kettle (the hot side). This is called the bittering addition.
Boiling encourages hops to release alpha and beta acids to add bitterness. But it also vaporizes the essential oils that provide floral and fruity aroma and flavor notes.
However, adding hops toward the end of the boil imparts their more delicate scents and flavors to the wort. But even a short time in boiling wort can destroy much of the aromatic hops’ potency.
That’s where dry hopping comes in.
What is The Benefit of Dry Hopping?
Adding hops during or after fermentation gives your homebrew a massive blast of flower and fruity power. The essential oils in the hops are preserved instead of boiling away or dropping out. This is a best practice for making big, hoppy IPAs or a Hazy IPA (NEIPA). You’ll see it used in other styles too like Pilsner, Saison, and Kölsch – to name a few.

Dry Hopping Vs. Wet Hopping
Wet hopping (or adding fresh hops) is when you pull the hops right off the bine while they’re fresh and add it to any stage of making beer. Typically, wet hopping is done during wort boiling and whirlpooling (flameout).
Dry hopping is when you add dried (or fresh) hops to the fermenter or keg to give your beer a big burst of hop aroma and flavor. They’re different practices that yield completely different results. And it’s fun to experiment with both techniques.
What Is Double Dry Hopping (DDH)?
This is a brewing technique that has two different meanings depending on who you ask. It could mean splitting the dry-hop additions at different times, for example, adding some hops during fermentation and some after fermentation.
Or it could mean literally double the number of hops added during or after fermentation. So for example, if you normally make a dry-hopped beer and you want to make a DDH version, you could add twice the amount of dry hops you normally use in your recipe.
The DDH label is great for craft beer marketing. But for homebrewing, it really doesn’t matter. Whichever method you practice and want to call DDH, go for it!
Ready to improve your all-grain brewing process and dial in your system?
This video course covers techniques and processes for water chemistry, yeast health, mashing, fermentation temperature, dry-hopping, zero-oxygen packaging and more!
Click Here to Learn More
A Quick Hop Chemical Guide
To better understand how dry hopping works and why it’s beneficial, you first need to know a little more about the three most important chemicals in hops.
- Alpha Acids give beer its bitter flavor but also prevent the growth of unwanted bacteria and promote fermentation of the wort. When hops are boiled, alpha acids are transformed into isomerized alpha acids, also called iso-alpha acids. They’re a more soluble compound responsible for giving your beer its delicious bitterness. A beer’s iso-alpha acid content in parts per million determines its IBUs.
- Beta Acids also add to your beer’s bitterness, but more importantly, they extend its shelf life. Beta acids oxidize during the fermentation process, which means they lose electrons from their atoms, thereby changing their composition. Be sure to keep an eye on beta acids while brewing because their oxidation can negatively affect your beer’s flavor.
- Essential Oils add aroma and flavor to your brew. They’re much more volatile than alpha and beta acids. The essential oils from bittering hops will evaporate. A recipe may call for you to add more hops during the last 5 to 15 minutes of your boil, at flameout, or by dry hopping.
In his book, Designing Great Beers, Ray Daniels says dry-hopped beer has a fresher hop taste that “may be more spicy or resinous” than beers hopped solely in the kettle. If you’re after those big, bright, hoppy aromas and tastes, dry hopping will give them to you in spades.

If you're creating beer recipes from scratch, I recommend keeping this book in your library after reading it. It's a timeless resource for any crafty and creative homebrewer.
When Should You Dry Hop Your Homebrew?
There are four stages where you can add hops to your homebrew after the wort has been chilled, added to the fermenter, and pitched the yeast.
- Before Fermentation (Hopback): Limits oxygen, takes advantage of biotransformation, and can be done with a HopRocket™.
- During Fermentation (Primary Fermentation): Limits oxygen and takes advantage of biotransformation.
- After Fermentation (Secondary Fermentation): Reduces “hop creep” and allows you to harvest clean yeast.
- In The Keg (Packaging): Also reduces “hop creep,” allows yeast harvesting, and provides the freshest hop flavor and aroma in the glass.
Dry Hopping Before Fermentation
Using another kettle or HopRocket™, you can run the cooled wort through a bunch of hops before it enters your fermenter. This is not to be confused with adding hops during the whirlpool which is hot wort.
Instead, you’re running cooled wort through hops and not letting the hop material sit in the beer during fermentation. There are benefits including less hop cleanup after fermentation and a greater chance of achieving biotransformation with your yeast.
Dry Hopping During Primary Fermentation
Adding hops during primary fermentation is common practice with IPA brewers. The active yeast in your fermenter will reduce hop oil compounds, but transform others into new and distinctive ones that impart floral flavors and aromas without fear of bacterial baddies. This is called Biotransformation.
Scott Janish found a 2003 study titled, “Biotransformation of hop aroma terpenoids by ale and lager yeasts.” The study found yeast transforms terpenoids like geraniol into citronellol and linalool into terpineol. In other words, you can get new flavors and aromas by mixing hops and yeast. Pretty cool!
However, if you had hops early during active primary fermentation the biotransformation process could decrease. So you can try dry hopping your beer before adding yeast or later in the fermentation process. I’ve heard pro brewers recommend adding hops at the tail end of primary fermentation.
I recommend diving into Scott Janish’s book The New IPA to get an in-depth look into biotransformation.

If you're interested in brewing Hazy or New England IPA (NEIPA), then you need this book handy in your library. It'll be filled with highlighter ink before you know it!
Make sure you add the hops before fermentation is complete. The active yeast can scavenge any excess oxygen, work their magic on the hop compounds, and help support the hops in their antibacterial efforts.
Dry Hopping After Fermentation
Some of the more pleasant aroma compounds found in hops may be scrubbed, or removed by chemical reactions, during primary fermentation. Some hop oils attach themselves to and escape with, CO2. Others latch onto yeast cells and get dragged into the trub when the yeast flocculates.
The hops find a different environment after fermentation. The vigorous CO2 bubbling of primary fermentation is finished, so the hops won’t lose their aroma compounds to scrubbing. And bacterial contamination is even less of a threat since the wort has a higher alcohol content, less available oxygen, and lower pH.
However, the biggest risk of dry hopping after fermentation is letting unwanted oxygen. And you also run the risk of “hop creep.” To prevent hop creep, simply lower the fermentation temperature to 58º F (14.5º C). This is enough to slow down, settle out the yeast, and not too cold to extract the hoppy goodness.
What Is “Hop Creep”?
“Hop Creep” is a phenomenon where dry-hopping results in MORE fermentation. Dr. Shellhammer of Oregon State University, and one of the top brewing scientists, claim dry-hopping frees up more fermentable sugars. This means your beer may finish at a lower gravity resulting in a higher alcoholic beer than intended. You can read more about it here.
Dry Hopping In The Keg
You can emulate the brewmasters of old with this traditional method of adding hops to the finished beer. However, we recommend using a bag to keep your hops under control and out of your lines and tap. Nobody wants a free salad with their beer.
Containing your hops is also beneficial since you’ll be limiting the time they spend in the keg. After 3 to 7 days in the keg, the hops provide little additional aromatics or flavor. In fact, there’s a chance your beer will develop unpleasantly grassy or otherwise funky flavors if the hops overstay their welcome.
So while flavors certainly do evolve with age, if this is a concern for you, plan ahead to add and remove the hops without adding dreaded oxygen into the mix.
Once again, O2 is the bad guy. Add your bagged hops to the keg before you add the wort, and then purge excess oxygen with a blast of CO2 before racking the beer on top. Because CO2 is heavier than oxygen, it provides a protective blanket of gas to cover the hops and avoid oxidizing your homebrew.
4 Dry Hopping Techniques
Depending on the type of equipment you own and cleaning tolerance, there are different techniques to achieving hoppy aromas and flavors by adding hops during and after fermentation.
- Adding Hops Directly, with a Muslin Bag, or Stainless Steel Mesh Tube (Easy)
- Making a Hop Tea or Tincture (Easy)
- Adding Hops with a Hop Dropper (Advanced)
- Using a Randall or Hop Rocket (Advanced)
1. Adding Hops Directly, with a Muslin/Nylon Bag, or Stainless Steel Mesh Tube
The easiest way to add your dry hop addition to your fermenter is by opening the lid and dumping the hops in. It’ll give you the most hop flavor and aroma too. But if you’re dry-hopping after fermentation, you can add unwanted oxygen to the beer and cause oxidation.
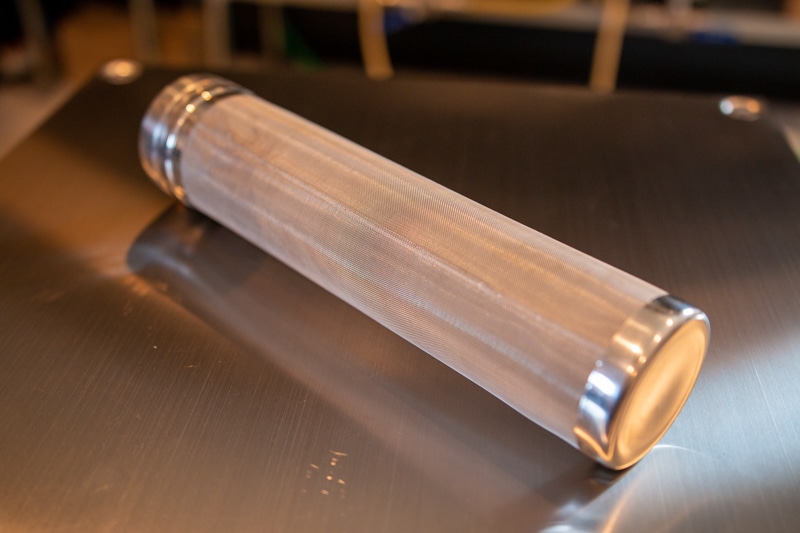
You can also use a sanitized stainless steel mesh tube or muslin bag (with some pie weights) to contain the hops as you drop them in. This will limit clean-up and avoid clogging the airlock, blow-off tube, and siphon hose. However, this method limits hop flavor and will still add oxygen.
A better solution would be to use my zero-oxygen dry-hopping technique, which I’ll cover in a bit. But if you don’t want to upgrade your equipment, there’s a low-tech option too.
If you’re using a stainless steel fermenter, you can use a muslin bag packed with your dry hops and a strong magnet. Place the bag of hops above the beer inside the fermenter using another strong magnet on the outside of the fermenter. This will hold the hops in place as active fermentation takes place. When fermentation is complete, remove the magnet from the outside of the fermenter and the hop sack will drop into the beer avoiding oxygen.
However, if you’re using a glass or plastic carboy, you can keep things tidy and reduce the risk of a messy mishap by either using whole hops (leaves or cones) or containing your hops in an infusion tube like the one below.
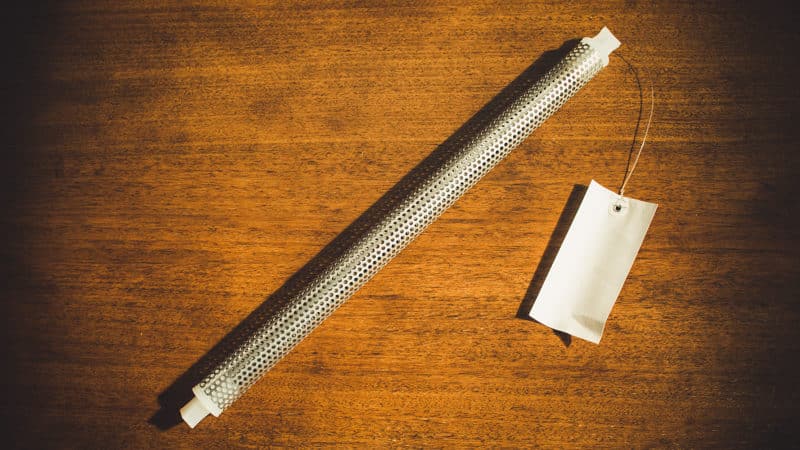
An infusion tube better than a muslin or nylon bag that’ll swell with moisture and get stuck like a ship in a bottle.
2. Making a Hop Tea or Tincture
The taste and smell of a raw hop can give you some hints at how it’ll finish in your homebrew. But you can borrow some tech from another brewing hobby—making good coffee—to get an even better idea of your hops’ potential.
Grab your French press. Dry hopping just went continental, mon amie.
Place a sample of the hops of your choice—pellet, cone, or raw—into your French Press coffee maker and add enough pale ale to cover them completely. Give it fifteen minutes, press the plunger down, and pour the beer into a glass and taste it.
It’ll likely be a bit flat since the pressing pushes CO2 out of suspension. But it also extracts the essence of the hop and will give you a good idea of how the hops will contribute to your next beer.
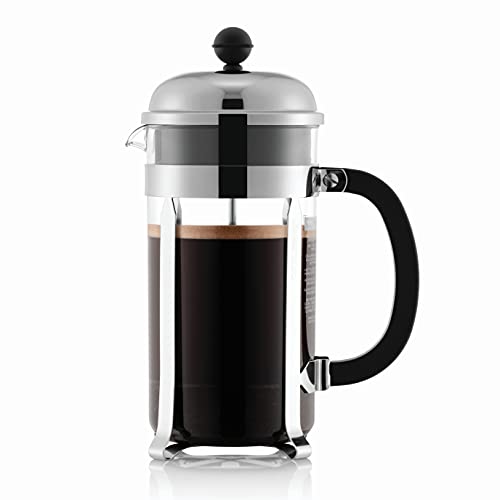
This handy tool is excellent for homebrewing. You can make hop and malt teas to taste your ingredients before crafting recipes or use it as a dry-hopping method.
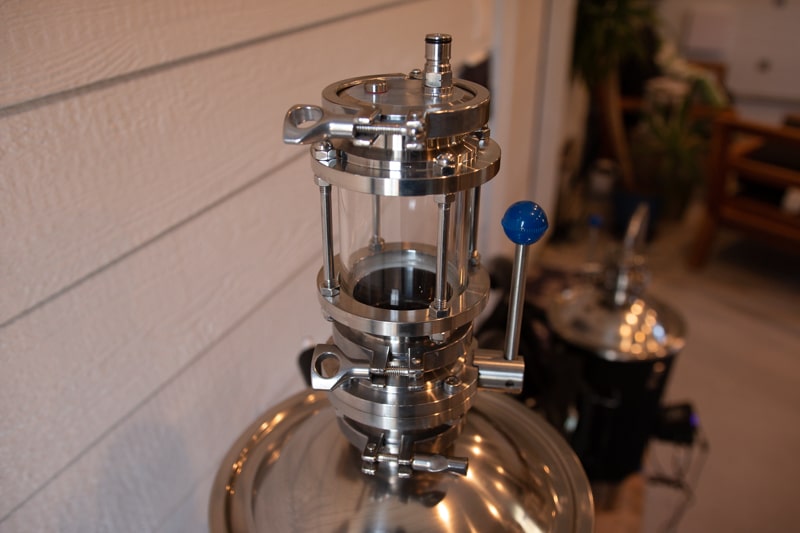
3. Zero-Oxygen Dry Hopping with a Custom-Built Hop Dropper
Oxygen is the enemy of beer; at least after fermentation is complete. Any amount of oxygen can oxidize your beer leaving it tasting caramel-sweet and cardboard-y. This is especially true for certain styles like Hazy IPA or New England IPA (NEIPA). And if you’re looking for a “perfect” Hazy IPA homebrew recipe, click here.
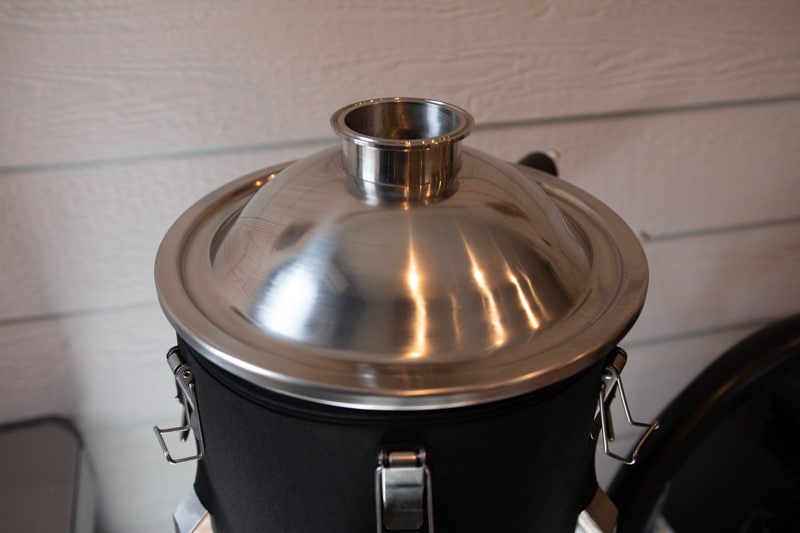
Adding hops into the fermenter post-fermentation is a chance to introduce oxygen into your beer when you don’t want it. Here’s a way to dry hop with zero oxygen using a hop dropper. You need the right fermenter and a few parts to build yourself.
You need a fermenter with a stainless steel lid and an opening to hold a tri-clamp fitting. It can either be 1.5″ or bigger. The wider the opening, the easier it is for hops to drop.
In my home brewery setup, I use SS Brewtech conical and bucket fermenter with 3″ tri-clamp openings on the lid.
You’ll need a few parts to complete your own hop dropper, including:
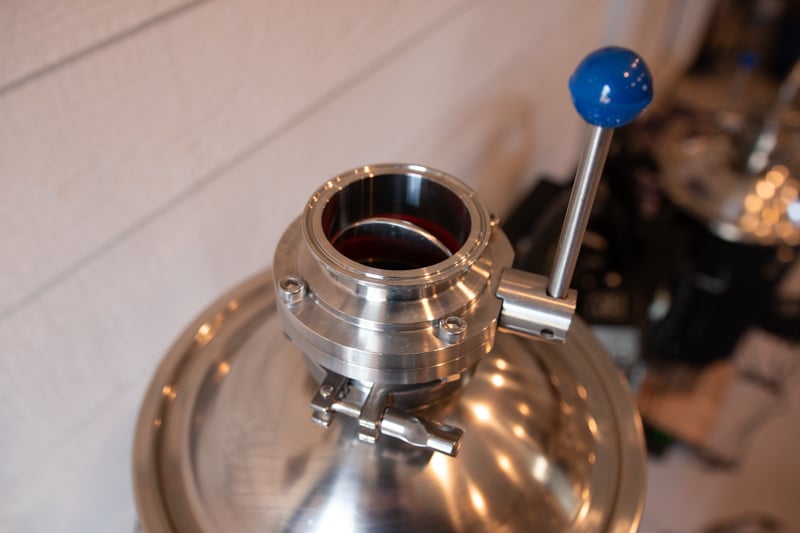
- Tri-Clamp Butterfly valve
- Tri-Clamp Spool Tube or In-line Sight Glass (if you want to see the hops as they drop)
- Tri-Clamp cap with ball lock post and pressure relief valve
- 3 Tri-Clamp gaskets
- 3 Tri-Clamps
First, on the lid of the fermenter, add a gasket and butterfly valve with the clamp. The opening/closing mechanism will block oxygen from getting in when you install the hop dropper. Plus, it drops the hops.
Next, add another gasket and In-line sight glass. Secure with another tri-clamp.
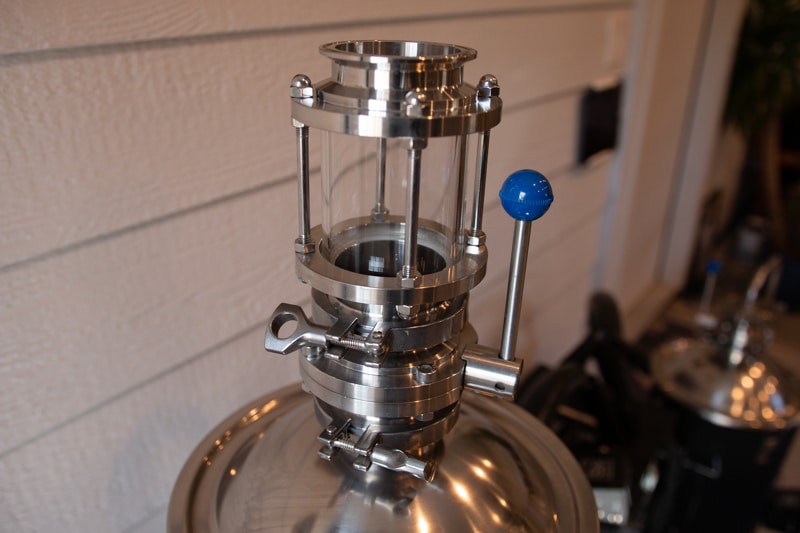
Finally, you’ll add another gasket and a cap with ball lock post and pressure relief valve secured with another tri-clamp. This is the most important piece. It’ll allow you to purge the hops with CO2 before dropping them.
4. Using a Randall or Hop Rocket
This is also known as a hop back or hop infuser and the technique is simple. The unit lets you run hot (or chilled) wort through and into your fermenter picking up hop flavor along the way.
To explain how to use one, check out the video below from David Heath’s YouTube Channel.

The HopRocket is hop-infusing tool used as a hopback, but also doubles as an inline hop infuser (Randall).
Choosing the Right Hop Varieties for Dry Hopping
Whether you’re growing hops in your backyard or carefully curating hops for your newest award-winning IPA, the “right” type of hops for dry hopping are the ones with the aromas and taste you like best.
You can also match your hops to the origin and style of the beer. For instance, you might use English Goldings when you’re brewing an IPA or a mild Sovereign to bitter but not overpower your stout.
Why not hop (sorry) over to an online pairing tool if you’re technically inclined? You’ll find a range of hops to add the perfect blend of bitterness and flavor to the style you’re homebrewing.
No matter what kind of beer you’re brewing, it’s hard to go wrong with classics like Cascade, Centennial, Fuggles, Saaz, Styrian or East Kent Goldings, Hallertauer, Tettnanger, Northern Brewer, and Willamette.
If you’re looking for something more avant-garde aroma hops, consider hop styles such as Galaxy, Nelson Sauvin, Amarillo®, Glacier, Lemondrop, Opal, Sovereign, Palisade, Wai-iti, and Citra®.
How Many Hops Should You Use?
In dry hopping, as with most homebrewing adventures, the correct answer to the question of quantity is, “it depends.”
Shoot for between .5 and 4 ounces per 5-gallon batch. Anywhere from .5 to 1 ounce can work for American pale ales. You can use up to 2 ounces for IPAs, and 2 to 4 ounces for double IPAs.
For instance, Citra hops are olfactory bruisers and will yield an intense aroma at quantities as small as 1 ounce per 5-gallon batch. Other varieties, such as East Kent Goldings, are far less potent and will need larger quantities to stand out in your finished homebrew.
Smelling and tasting your raw ingredients is the key when sizing hops for your batch. Dry hopping adds a much stronger and fresher hop aroma than adding hops during the boil. Trust your gut, don’t be afraid to experiment, and don’t shy away from big flavors.
At what point does dry hopping reach diminishing returns?
Hop researcher Dr. Tom Shellhammer conducted a study looking into the impact various dry hop quantities have on beer aroma and flavor. He found dry hop rates higher than 1.1 oz/gal (8 g/L) is an “inefficient use of raw materials.” If you’re using software like BrewFather, there’s an automatic calculation based on this study. If you’re interested in learning more about this experiment, check out episode 001 of The Bru Lab where they interview Dr. Shellhammer on this exact topic.
Should You Use Hop Pellets, Plugs, Whole Cones, or Oil?
Like their boiled counterparts, the hops used in dry-hopping are available in three forms.
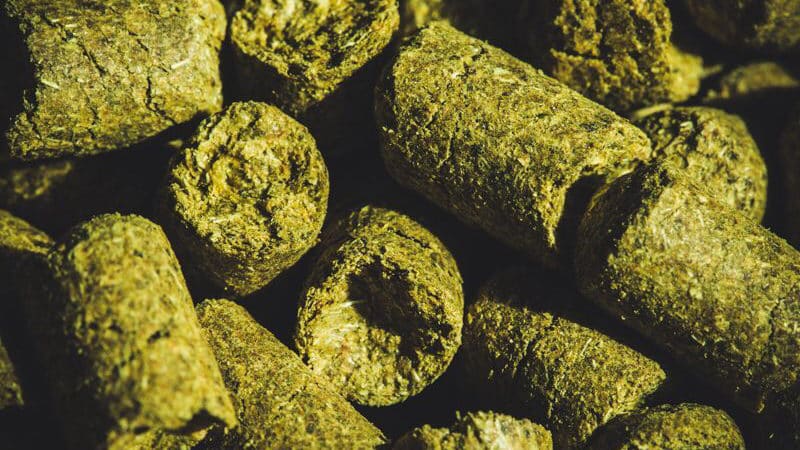
Using Pellet Hops
There are two main pellet hops you can use to dry hop your homebrew:
- T-90 (Most Common)
- T-45: Cryo Hops®, LupoMax®, LupuLN2® or Hop Powder
T-90 is your standard hop pellet. The hops are milled into a powder and pressed through a die forming the pellet. The T-45 is a concentrated pellet of lupulin power that gives you all the hop punch with none of the vegetal material.
T-45 hop pellets are ideal for dry hopping because you can use half the amount of them and get the same hop power as T-90 pellets.
Although pellets usually contain lower concentrations of essential oils than whole cones, they’re more easily extracted and produce more aroma. They’re also less likely to harbor bacteria than their whole-flower cousins. Plus, they offer a longer shelf life.
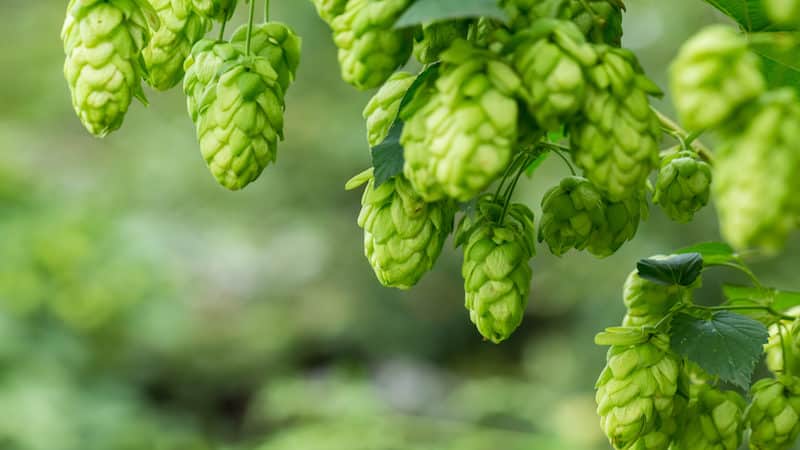
Using Whole Cone Hops
Whole cones have the best aromas and freshest flavors, but a limited shelf life and they take up a lot of room because you need a larger amount than pellets. Oxidized beer is also a bigger risk with whole cones because the flowers create lots of nooks and crannies for O2 to hitch a ride.
Whole cones also float, further raising the risk of oxygen contamination. You can address this issue by weighing down your hops bag with well-sanitized stainless steel washers or marbles.
Using Hop Plugs
Similar to whole hops, plugs walk the line between the other two options. They stay fresh longer than whole hops, and they’re made specifically for dry hopping.
Plugs are packaged in convenient units that eliminate the need for weighing, which adds to their convenience. However, they can be hard to break down into small bits, so keep your bag or infusion tube handy.
Using Hop Oil
If you want all the dry-hoppy goodness without the mess, then consider using hop oil or hop extract to dose your beer. This is used more commonly in commercial breweries because they’re able to yield more beer without losing it to hop sludge.
If you want more information on hop oils and extracts, check out Scott Janish’s article here.
How Long Should You Dry Hop For?
Ask three homebrewers about dry hopping, and you’ll get four opinions. In his book How To Brew, John Palmer recommends dry hopping your homebrew with “3 to 5 days contact time.”
In The Homebrewer’s Companion, Charlie Papazian says you can dry hop your beer at any time “during final 1 to 2 weeks before bottling or kegging.”
Some folks have even conducted extensive first-hand experiments in search of the “perfect” dry-hopping time frame.
But the right amount of time to dry hop your beer is really up to you. Your goals and your taste buds set the standard.
It’s useful to remember that pellet and plug hops release their extract at different rates. Aroma compounds in pelletized hops are extracted in as little as a day or two, whereas whole cones can take a week or more.
But longer extractions, especially with pellets, also increase the presence of compounds called polyphenols that can improve the shelf life and potentially ruin the flavor of your beer.
Frequently Asked Questions about Dry Hopping
Why settle for another middle-of-the-road beer when you could be crafting a hop-forward masterpiece? The delicious and delightful nuances of hops are at your command with dry hopping. Choose the hops you love, and add them to your fermenting wort. Mix and match. Experiment. Big hops flavor, and homebrewing satisfaction, are waiting.
What Temperature Should You Dry Hop At?
You can dry hop at any temperature, but I recommend trying under 60ºF or as low as 34-39ºF (1-4ºC). This will reduce the chance of hops causing a refermentation effect known as “hop creep.”
How Do You Remove Hops After Dry Hopping?
When you dry hop, use either muslin or nylon bags to add your hops. You can also use a stainless steel mesh tube specifically for homebrewing to add your dry-hop charge. When you’ve transferred the beer to your serving vessel, you can easily remove the bag or tube of hops to discard.
When Can I Bottle After Dry Hopping?
Typically, you should dry hop your beer for about 3-4 days after fermentation is complete. When those days are over, it’s safe to bottle your beer.
Should I Dump Yeast Before Dry Hopping
Yes! If you have a conical fermenter, dumping the yeast before you dry hop will allow you to harvest clean yeast without any hop debris. It’ll also protect your beer from any off-flavors that could occur from autolysis.
Happy Brewing!