My name is Matt Giovanisci (Jiva-Knee-See), and I’ve been homebrewing since 2006. I own a house with space to build the ultimate home brewery setup. It has a second garage (with a roof deck) added to the house for storage.
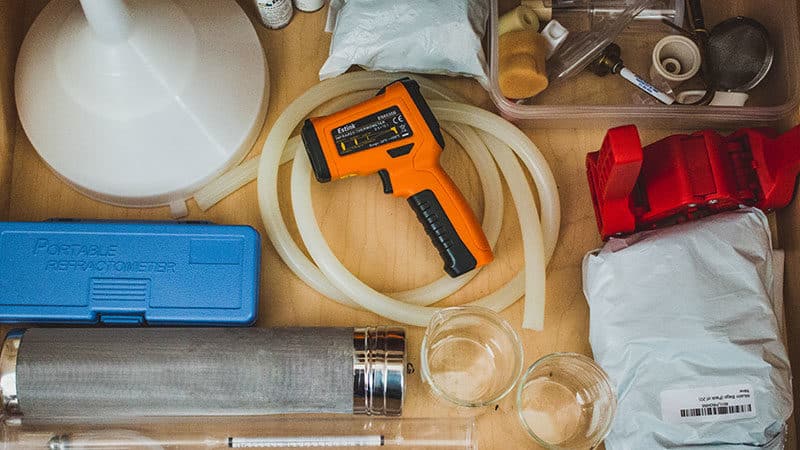
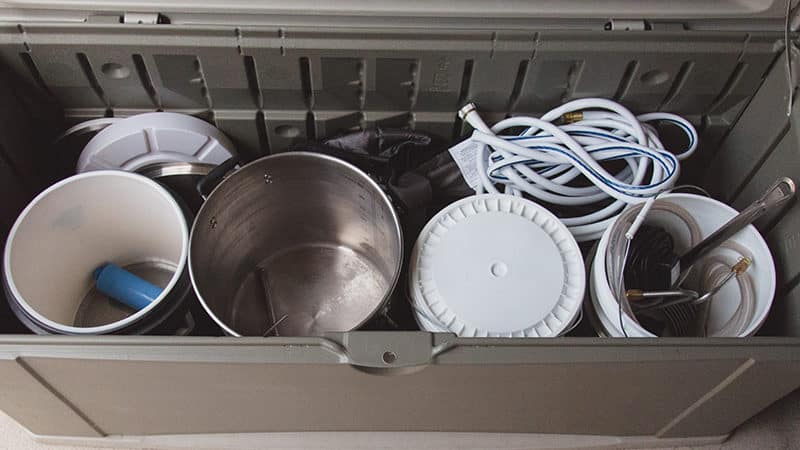
The Homebrew Equipment I Already Own
I started with extract brewing on the kitchen stove long before I switched to all-grain brewing. Back then, I built my own mash tun and stir plate, which failed instantly. Again, not handy.
When I moved to Colorado from New Jersey, I sold all my brewing gear before leaving. The good news (and bad news for my wallet) is I got to buy new homebrewing equipment and start from scratch.
My original brew day setup for 5-gallon batches was a Hot Liquor Tank and Boil Kettle from Kegworks by BeverageFactory.com. And my mash tun was a Fermenter’s Favorite by NorthernBrewer.com.
For a heat source, I went with the Anvil burner because I liked the orange color – damn my designer’s brain! But to be honest, I always hated using propane. It made me nervous and it felt like such a waste of money and energy. I’d go through a propane tank every two batches.
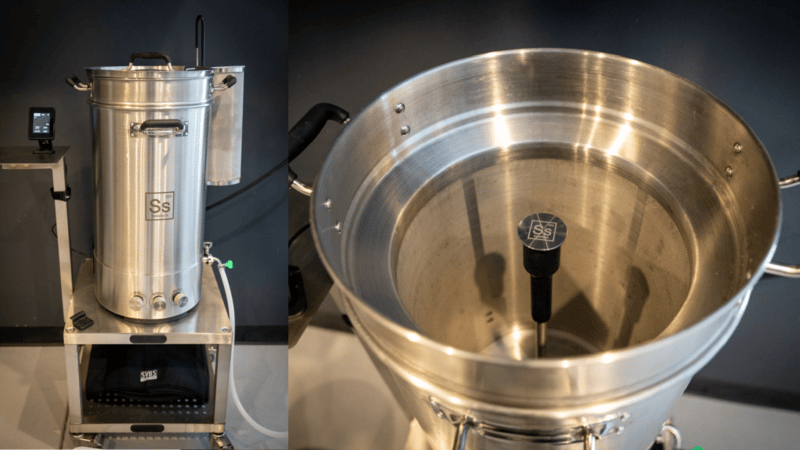
So I hired an electrician to design a few outlets that could be installed and removed with no damage. And this allowed me to buy my dream setup: The Ss BrewTech 3V Electric Brewing System.
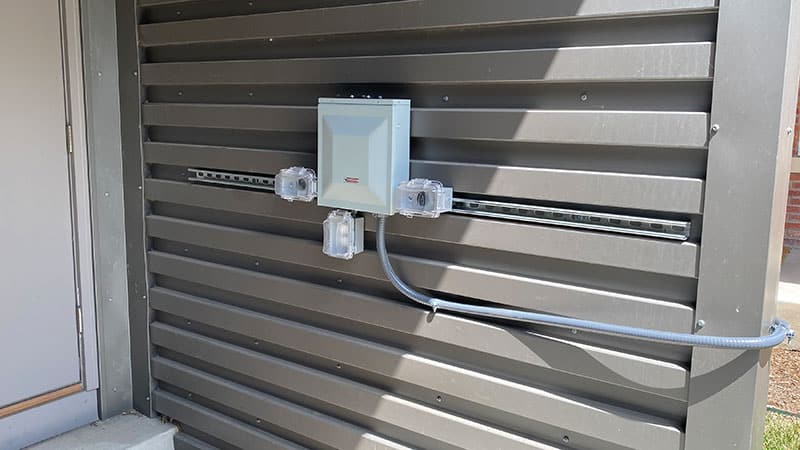
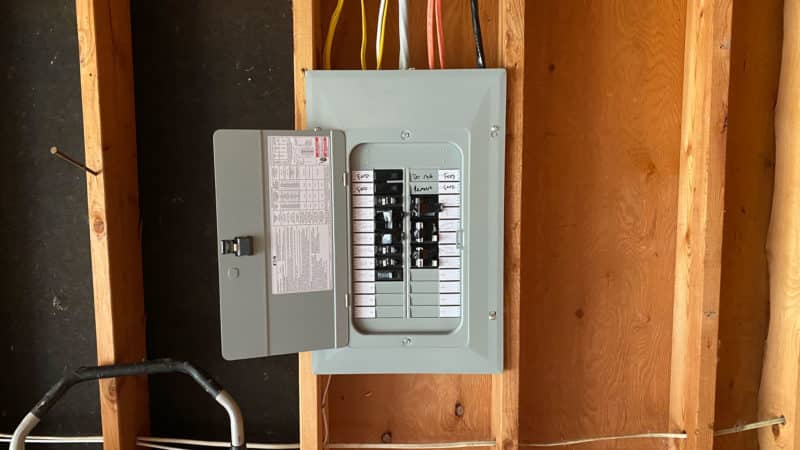
A direct wire from the electrical box (located around the corner of the wall) with a subpanel housing two GFCI 240v twist-lock outlets and a 120v standard outlet. Everything was mounted with the existing screws holding up the siding.
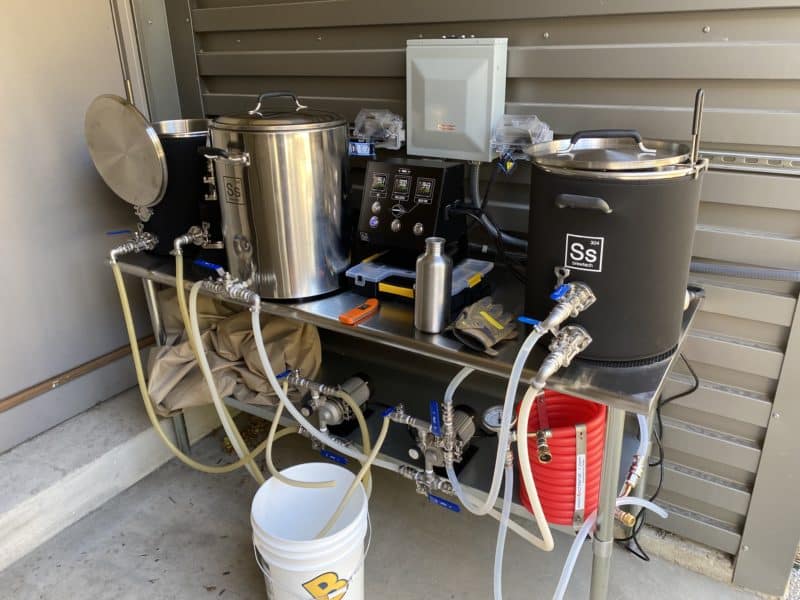
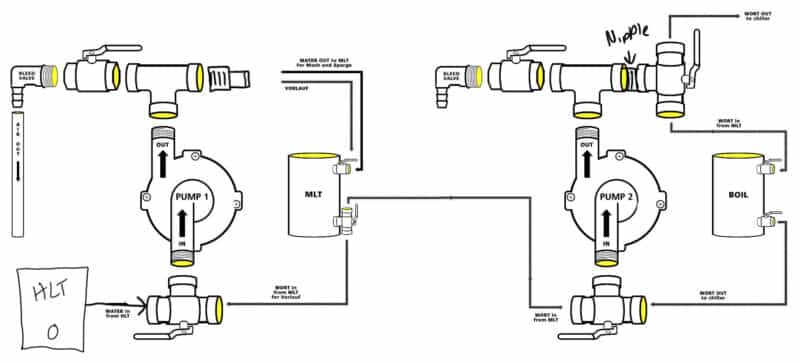
This system includes an Ss Brewtech Hot Liquor Tank, Mash Tun, RIMS, and Boil Kettle with the 3v control panel for 5-gallon batches. And it has two Blichmann Riptide pumps and an Exchillerator counterflow wort chiller. This setup allows me to move all the wort around without lifting a thing. It’s all controlled by ball valves and pumps (thanks to BYO magazine with minor tweaks).
I’m setting this up permanently in the new garage space.
Assessing The Garage Space And Initial Design Concepts
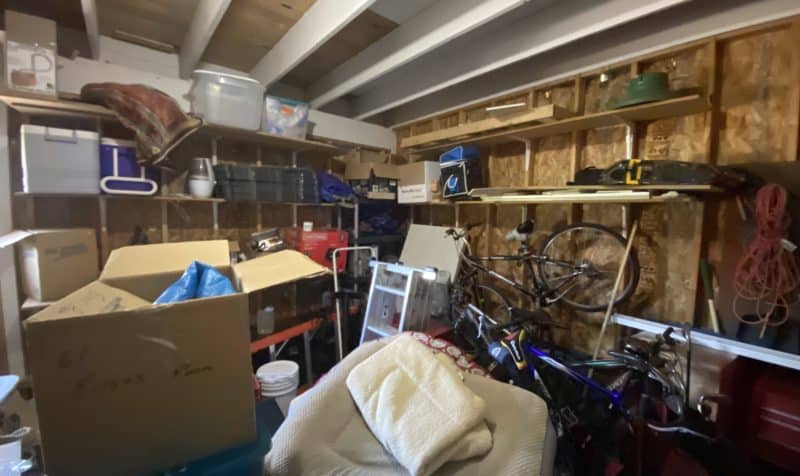
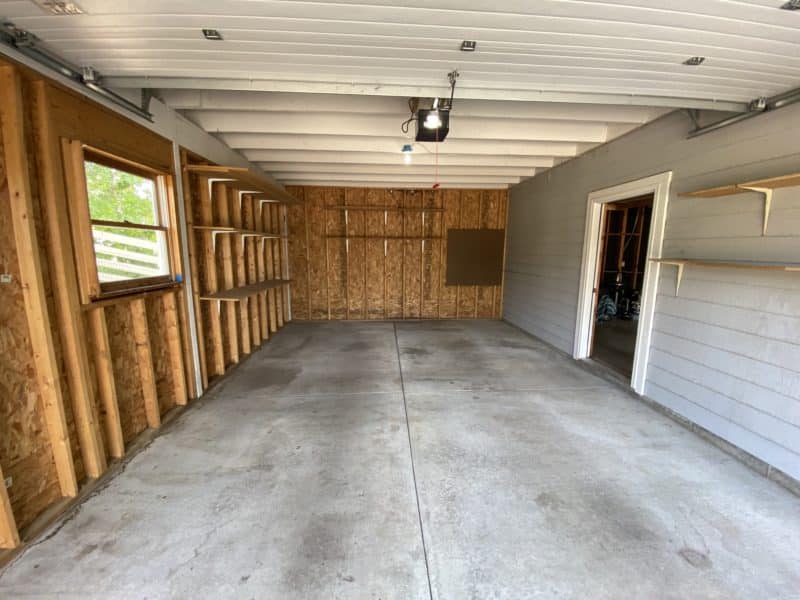
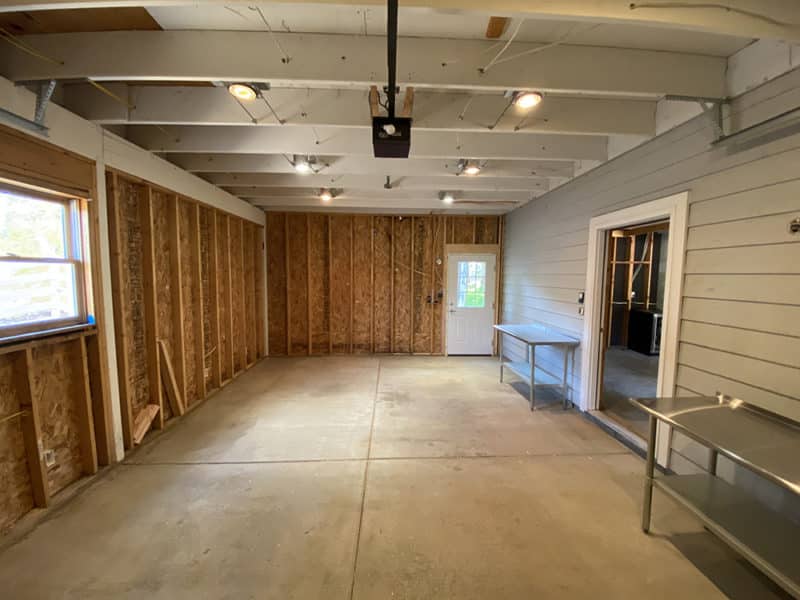
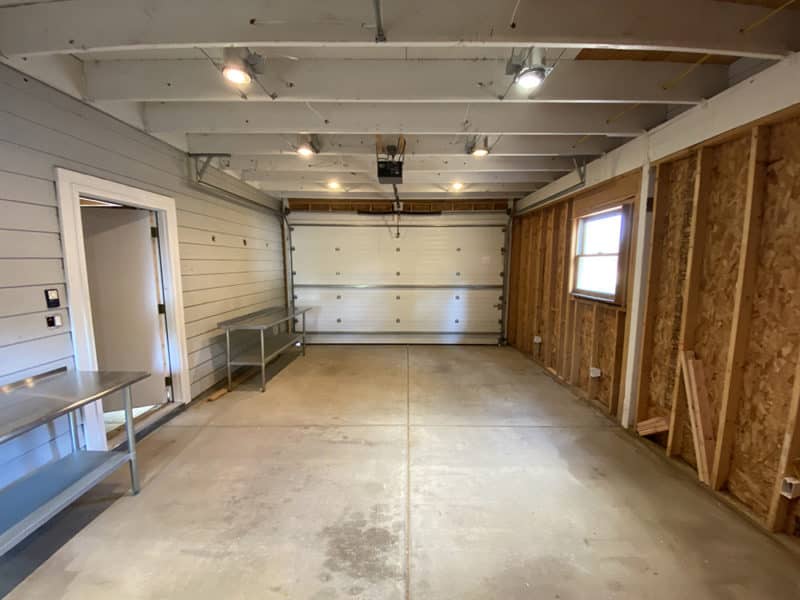
One of the main reasons we bought this house was the extra garage. Once I knew we had the house, I wanted to start planning out the brewery. Problem was, I couldn’t measure. The garage was packed!
Thankfully, my Dad is a kitchen designer and has been for over 30 years. He lives in New Jersey, so we had to collaborate via FaceTime and email.
He was able to count the studs in all the pictures I sent to get a rough estimate of the size. From that, he created the initial design draft in a program called 2020 (how appropriate for the time).
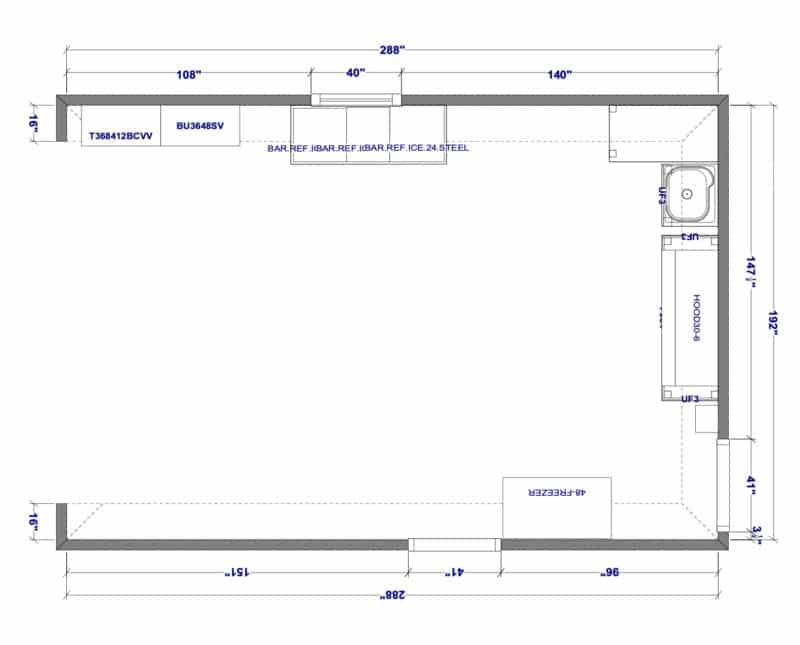

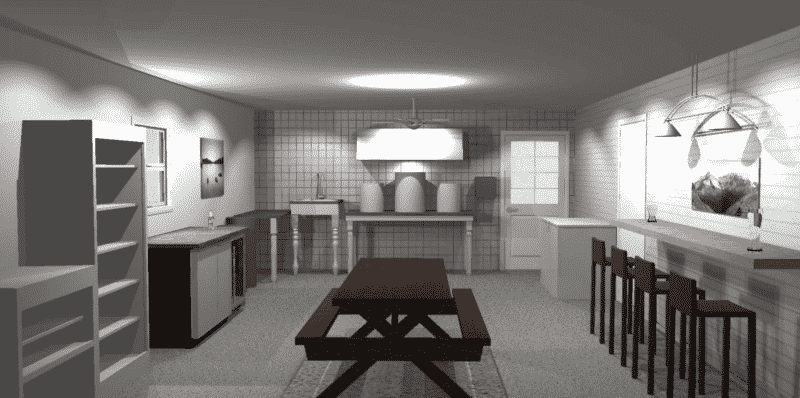
Obviously, the crude visuals of the sink and brew kettles are due to the fact it’s a mainly a kitchen design program. But it gave me a sense of the space to start making a plan.
Here are my initial thoughts on the design:
Access To The Rooftop Deck
On the back wall, I’m adding a door that’ll lead to the backyard so you can access the roof deck. Currently, the only way into the brewery is through the first garage. Also, the door will have windows to add more natural light.
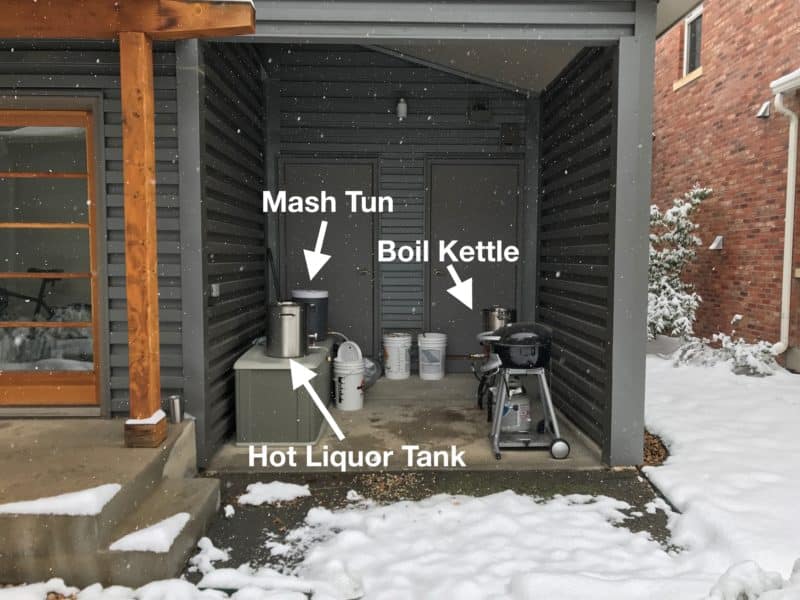
Wort Production
The back wall will also be “Wort Production.” From left to right is a utility sink with hot and cold water, the hot liquor tank, mash tun, and boil kettle on a six-foot table I already own. Plus, an overhead 6-foot condensate hood. And next to the door is the control panel.
Sanitation Station
The sink should be large enough to clean kettles and fermenters. Plus, a space for drying. I heard Brian over at Short Circuted Brewing say he wished he had a drain tray on his older sink. And I’d like to have an RO system attached to a pot filler for brewing water only.
Fermentation Station
The fermentation station is where all the conical fermenters, buckets, and carboys will be stored on wheels so they can be moved from the boil kettle back to the station with ease. I’ll max out at three fermenters because that’s all my Ss BrewTech glycol chiller can handle for fermentation temperature.
Preparation Station
I already own a 4-foot stainless steel prep table that I want to use to make yeast starters, package hops, can beer, and store small brewing gear. Ideally, I’d like to have shelves above it to store chemicals and other things. But I might exchange the table for a workbench with drawers for extra storage for things like hoses, parts, clamps, airlocks, and other miscellaneous brewing gear.
Ingredient Storage and Milling
I thought I would have enough room to have ALL my brewing needs in one space. But if I want space for people to hang out and drink, then I have to store my bulk ingredients in the other garage. This will give me more room. I’ll move the chest freezer, grain bins, and milling table there.
The Taproom
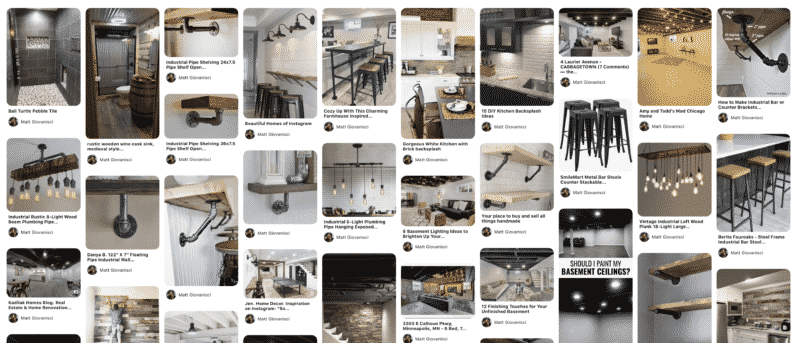
One of the walls is the outside of the house. That gave me the idea of making the brewery feel like it’s outside. So I want to paint it white and add a counter bar with outdoor walls lights (I got the inspiration for this on Pinterest of all places) and add some turf with a picnic table in the middle.
I created a board on Pinterest to collect the design ideas I liked.
For serving craft beer, I already own a bomber fridge, a can fridge, and a 3-tap kegerator. This has been plenty, but I ended up building a massive keezer that serves from 6 taps and holds up to 10 corny kegs. Now I can serve up to 9 batches of beer.
My dad was trying to convince me to put in a traditional bar. But I NEVER want to be a bartender. Pouring beer from a tap is fun and every patron should do it themselves. Plus, this leads into the idea that I don’t want anything to feel permanent.
Other Considerations
In case, we ever sell the place, I want the garage to function as a garage. I considered finishing the floors and adding tile to the back wall. But then it really can’t function as a garage. So everything will be designed to be removed or useful to another owner if we ever plan to sell.
I’d also like the ability to upgrade to a 10-gallon system in the future. I have the space for it and the controller would still work. Just need to switch out the kettles and mash tun.
Ready to improve your all-grain brewing process and dial in your system?
This video course covers techniques and processes for water chemistry, yeast health, mashing, fermentation temperature, dry-hopping, zero-oxygen packaging and more!
Click Here to Learn More
Designing The Home Brewery Setup
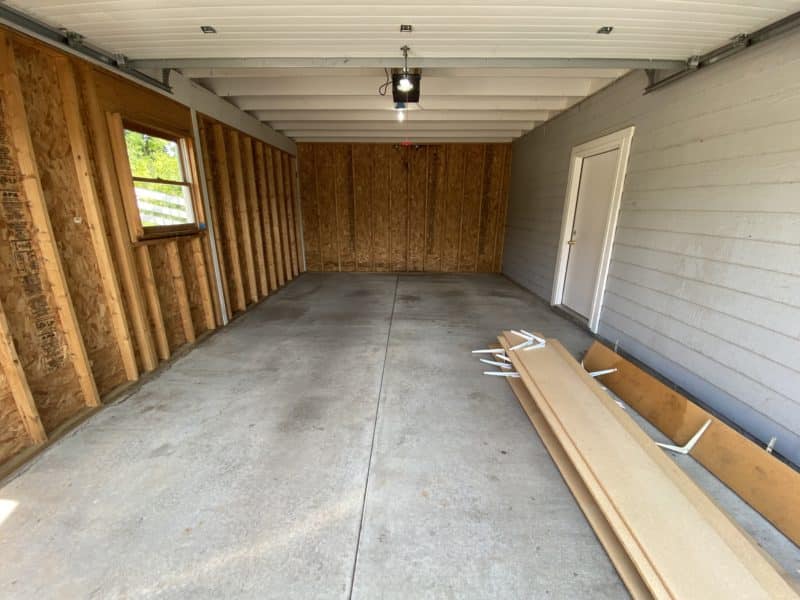
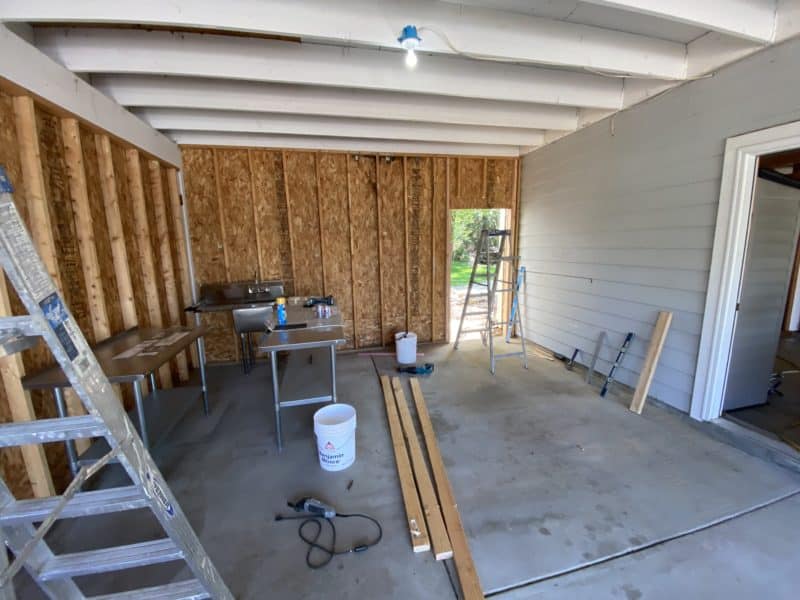
Once we moved in, we got a better sense of the space and were able to take measurements. Plus, I removed the shelves nailed and screwed to the wall. Told ya I knew how to use a screwdriver 😉🛠
Over FaceTime with my Dad, I took measurements and he plugged those new dimensions into the computer along with some design changes I had. Here was version two of the design.
Concerns About The Home Brewery Design
Again, since I don’t know what I’m doing and being my own General Contractor with this project, I have concerns that have kept me up at night. Mainly because I don’t know what my options are.
I’ve been surfing YouTube for months just trying to learn about every possibility. My hope is that I can rely on experienced contractors to lead me in the right direction.
Hood Ventilation?
Not surprisingly, there are very few videos on adding ventilation to a home brewery. Thankfully, Kal at TheElectricBrewery.com documented his original hood setup. But, at the time of writing this, there wasn’t much info on his new setup, which looks much cleaner.
Also, Brian from Short Circuited Brewers has been promising a video on his new hood setup, but nothing was created as of writing this. But he did mention he was having problems with leaking at first. So that’s something to keep my eye on when the time comes to install the ductwork.
Sink Plumbing?
Pipes freeze. I know this because my main job in life is in the pool industry. And the walls are framed with 2x4s and outside. I don’t think a plumber will run water and sewage lines in the wall.
Plus, I don’t want to run the drain into the concrete floor because that would be too permanent (and also not possible). Thankfully, there are a few YouTube videos I had to reference to come up with a solution. Mainly to add a pump to the bottom of the sink and drain up and over through the garage spaces.
Fermentation Temperature Control?
With fermenters, I need to control the temperature of the entire space. But I don’t think it’s brilliant tapping into our existing HVAC system. So I had to research other methods.
That’s when I found out about mini-splits which would allow me to heat and cool the space independently from the rest of the house. This makes the most sense, but I’m still not sure how necessary it’ll be after it’s insulated and drywalled.
And because of this, pulling permits would be that much harder because the country requires specific R-values for the insulation. And would it be considered extra living space now? More on this later.
Finding Contractors
Again, I’m not handy. I have to hire professionals to help me. Also, I’m new to the area and don’t know a lot of people. So I’m hoping I can find good help through recommendations.
The only contractor I worked with is the electrician who did the original electric brewing process set up at my old place. He was recommended by our neighbor at the time. And I’m hiring him to do this job.
Since her recommendation was great, I asked her if she knew a general handyman who could help me with a few small construction projects. Again, she had someone and that’s who I contacted.
We also worked with an HVAC company that we liked in our old place. So I figured they’d be a good place to start for installing the mini-split. They also do plumbing too.
About a few days after we moved in, I started calling contractors to scope out the work and give me quotes and ideas. With this information, I was able to nail down what was possible and what was a pipe dream in my head.
I also chose the contractors based on who I liked and their ideas. Not price.
Staying Organized In Asana and Google Sheets
Now we’re finally getting to my wheelhouse: organization! I pride myself on being highly organized in life and in business.
I use a program called Asana for project management and just about everything. I run my entire life from this software. I have a saying, “if it’s not in Asana, it doesn’t get done.”
So I created a simple board with three columns to track the progress of the brewery build: To Do, In Progress, and Done.
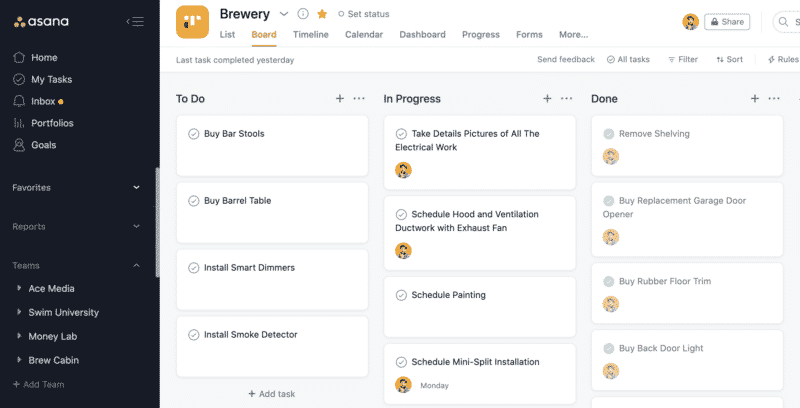
This will help me keep track of what I have to do as a general contractor—mainly, scheduling contractors, and buying supplies. It helps me visualize the order of operations so things don’t get jammed up.
Ideally, I’d like to have the brewery build done in 40 days. We moved into the house on September 19th. And the first contractor gave me an estimate for the plumbing on September 23rd.
On top of that, I’m keeping track of all my spending in a Google Sheet. This includes any new supplies I order and contracting work.
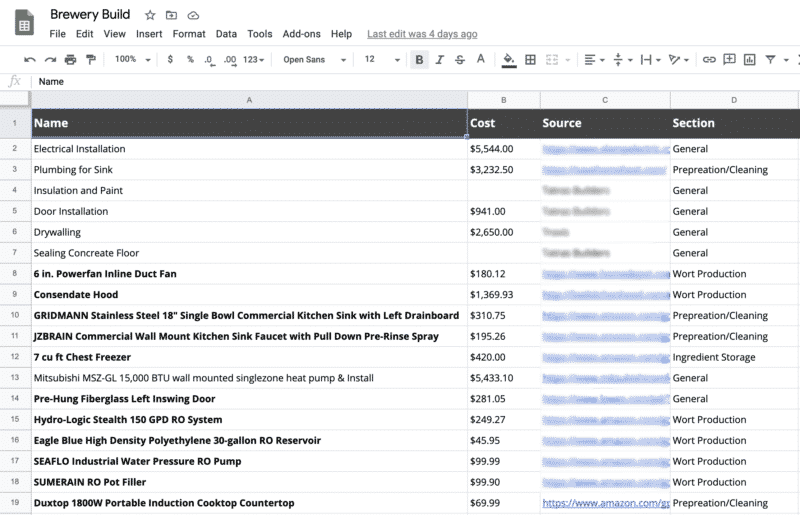
Items in BOLD are what I’ve already ordered or work that has been finished.
I haven’t added what I paid for the brewing supplies I already own. But I’d like to include this later because I think it would be helpful to know how much it costs to build this brewery over time.
Day 1: Adding The Back Door
After talking to the electrician, he suggested that the door be put in first so he can work around it. I contacted the handyman and he said he could do it if I supplied the door.
I did a bunch of research on doors. Initially, I wanted a door that would swing out into the yard. But neither Home Depot nor Lowes had any outswing doors in stock. So I decided on a pre-hung left inswing insulated door with a window. And this actually turned out to be a better decision.
I ordered it online and picked it up at the store that day. I had to ask my friend to help because he had a Ford Escape. The door wouldn’t fit in my tiny Subaru Crosstrek which is the only car my girlfriend and I own. We stored it on the floor in the garage.
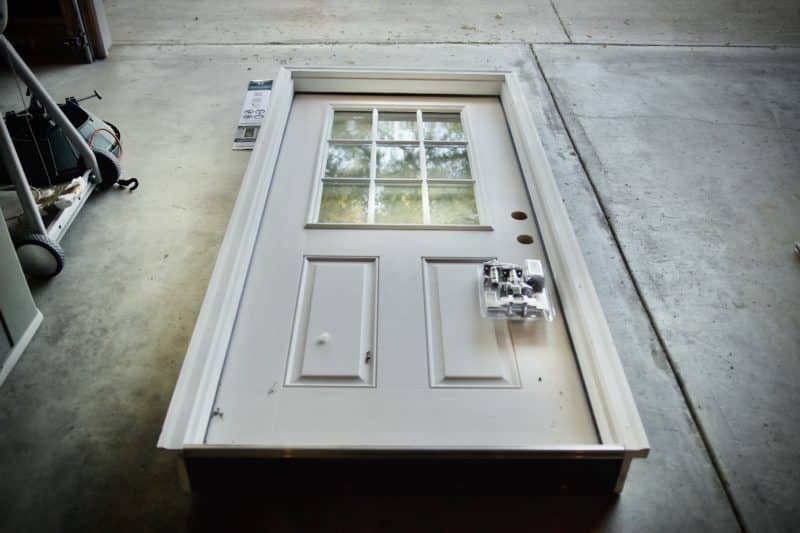
36-in x 80-in Fiberglass Half Lite Left-Hand Inswing Ready To Paint Unfinished Prehung Single Front. Also a Kwikset Delta Satin Chrome Single-Cylinder Deadbolt and Handle Combo. I’ll probably replace this later with a smart lock.
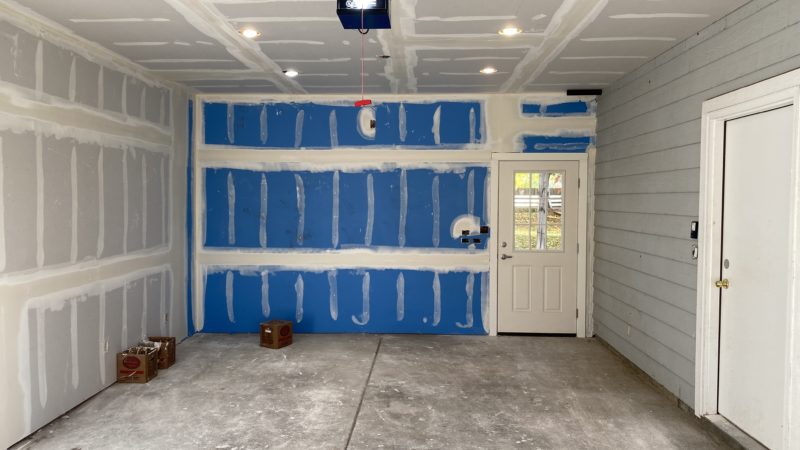
Two men showed up to install the door on October 1st. This was the first significant step of the brewery build. It took them all day, but I’m delighted with the work.
The door looks fantastic and provided a lot more natural light than I was expecting!

- Door: $281.05
- Handle and Lock: $45.55
- Labor: $1,003.00
- Total Cost: $1,329.60
Day 6: Installing Electricity
This took a lot of planning with my Dad. My biggest concern was getting the electrical hookup right for the Ss Brewtech 3v control panel which needs two 240v twist-lock outlets and a standard 120v outlet. And I needed it in the right spot.
I was also concerned about the hood and how it would be powered. I decided to copy precisely what Kal did with his original hood set up at TheElectricBrewery.com. That means, I only needed a standard 120v outlet to plug the fan into with a switch to control it.
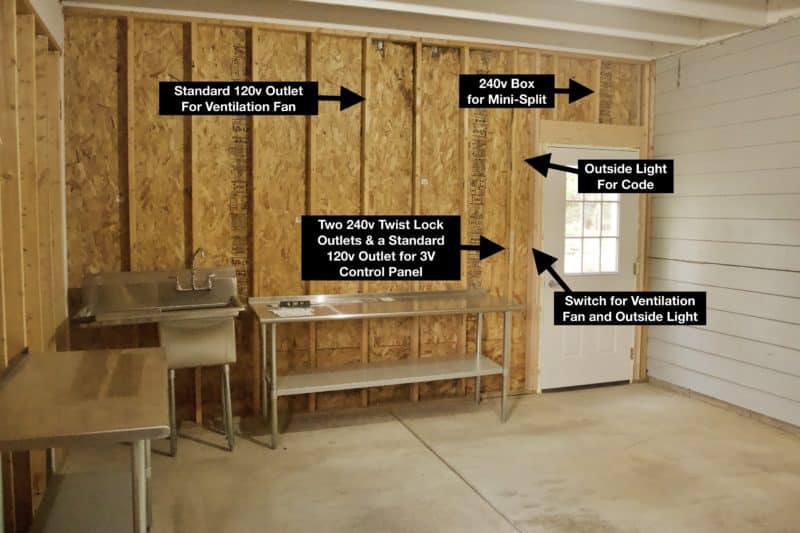
Then, I had to decide how many outlets I wanted and where I wanted them. Plus, all the lights and where to put them.
For all this, I used masking tape and a sharpie marker to indicate everything I wanted and where. I also shot a video for the electrical, which was helpful for his planning.
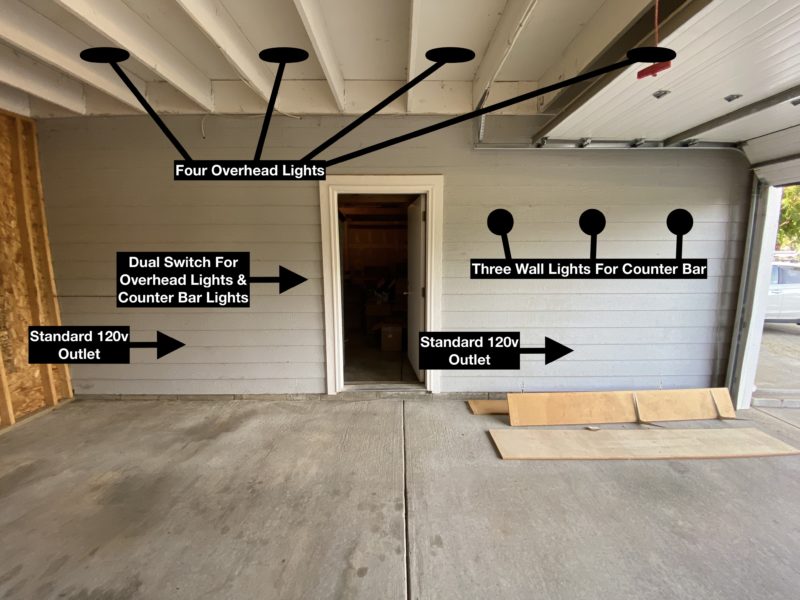
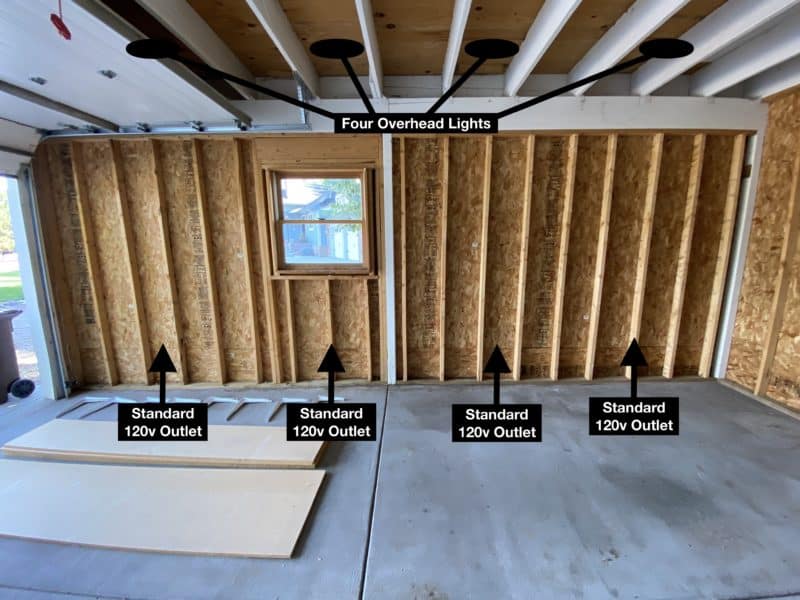
On October 6th, a team of electricians came out for the entire day to install all the electricity needed for the brewery. They ran one line from the basement electrical panel to a sub-panel located in the main garage. This subpanel controls the entire brewery.
While they were here, I asked if they could install a spot for a future ceiling fan. I might not add one, but I wanted the option just in case. They also cleaned up the wiring for the garage door opener and moved the opener switch to inside the brewery (instead of in the main garage).
After insulation, drywall, and painting are finished, they’ll come back to add all the lights, outlets, and switches.
- Three Counter Bar Lights and One Back Door Light: $209.76
- Two Lutron Caséta Smart Dimmers: $124.90
- Fan Speed Controller: $23.00
- Parts and Labor: $5,485.80
- Total Cost: $5,843.46
Day 16: Running Plumbing Into The Home Brewery
The first thing I did was buy the sink and faucet I wanted. Initially, I had the same sink as Kal from TheElectricBrewery.com in my Amazon cart. But after hearing Brian from Short Circuited Brewing lament about his regrets about not having a drying tray, I purchased a smaller sink with a drain tray.
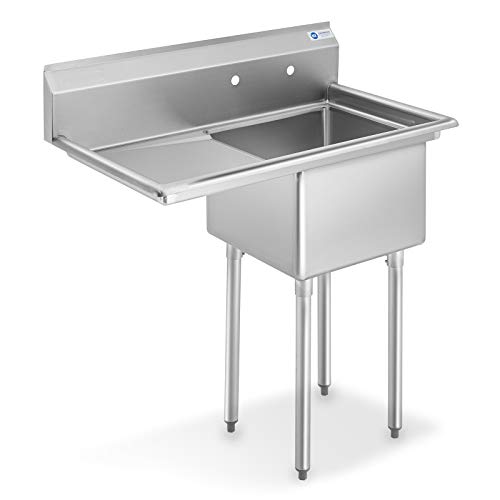
This is the exact sink I bought for my brewery because it had a left side drain tray.
Then, I went back and forth on whether to install an RO system. I’m really big on water chemistry since I’m a pool nerd and consider myself a backyard chemist. In fact, I have my water tested by Ward Labs every quarter and always add brewing salts and minerals to my water for every batch.
Having RO allows me to start with a blank slate and dial things in better. And since I have the space to do it, I might as well.
I watched Brian’s video on his RO set up like 50 times. And I bought all the same supplies he used.
For the plumbing job, I had three different contractors come out to give me estimates. Only one of them gave me an exact estimate, timeframe, and parts list. So I went with them since they seemed to be the most professional.
The plan was to install a Drainosaur under the sink that would pump the wastewater up and over both garages and down to the main drain line in the basement. I was hoping that all the pipes could be fitted behind the drywall, but I’m not that lucky.
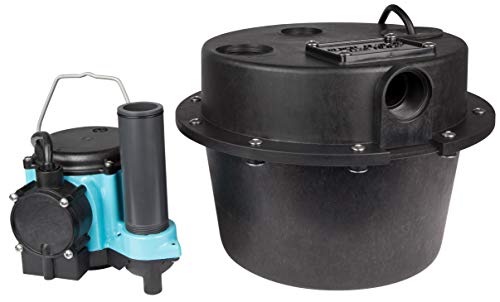
This is what we used for the sink drain in the home brewery because we couldn't run a drain line below grade.
The back of the home brewery is framed with 2x4s and is an outside wall. While they would do it if I signed a waiver, they advised against it. Instead, they wanted the plumbing to be outside of the drywall so it’s protected from freezing.
At first, I didn’t like the idea of seeing the plumbing. I thought about building a soffit to hide the pipes and the ventilation for the hood. But that seemed like overkill, plus I would have limited access to those things in case anything were to go wrong.
So, I just decided to embrace the idea that you’ll see pipes and ductwork along the back wall. I’ll just have to go for a more industrial look. And it’ll make it easier to fix or replace any parts that might go wrong. In the end, I think this is a good move.
Here’s a mockup of what I think the end result would look like:
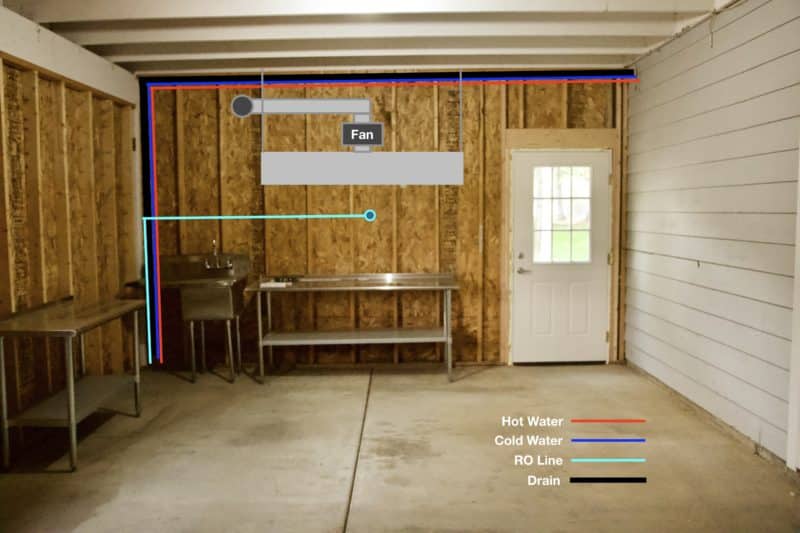
On October 16th, a couple of plumbers came out to start the initial work of running the hot, cold, and drain lines from the basement up through the main garage and overhead to the brewery.
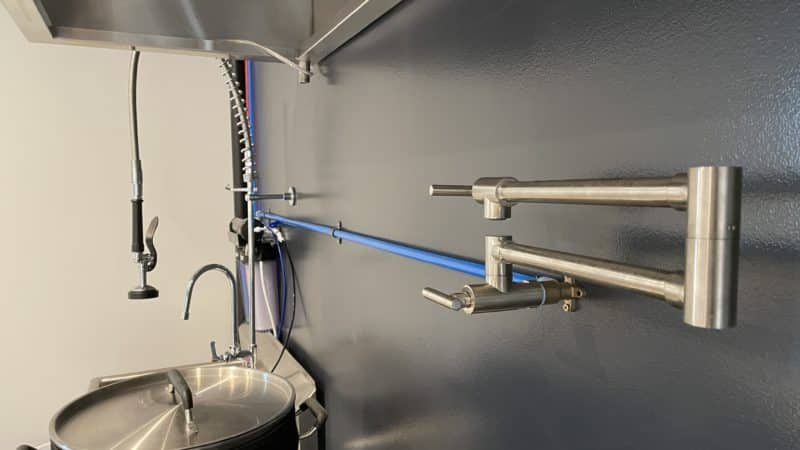
Once the insulation, drywall, and painting are finished, they’ll come back to hook everything up to the sink and Drainosaur. Plus, they’re also installing a single PEX line for the RO system to a pot filler on the wall above the brew kettles and mash tun.
My original plan was to store the big-ass RO reservoir under the drain try of the sink. But the Drainosaur has to go there. So I won’t know until everything is set up where this giant tank will go and not be in the way. I may have to do some clever design later.
- Sink: $310.75
- Faucet: $195.26
- RO System Plus Flush Kit: $249.27
- Reservoir: $45.95
- Float Valve: $19.95
- Pump: $99.99
- Pot Filler: $99.90
- Parts (including Drainosaur) and Labor: $3,232.50
- Total Cost: $4,253.57
Day 17: Insulation and Plans for Hanging the Condensate Hood
The same guy who installed the door was tasked to put in the insulation. First, he came back to take measurements so he could order the insulation and then have it shipped to the house.
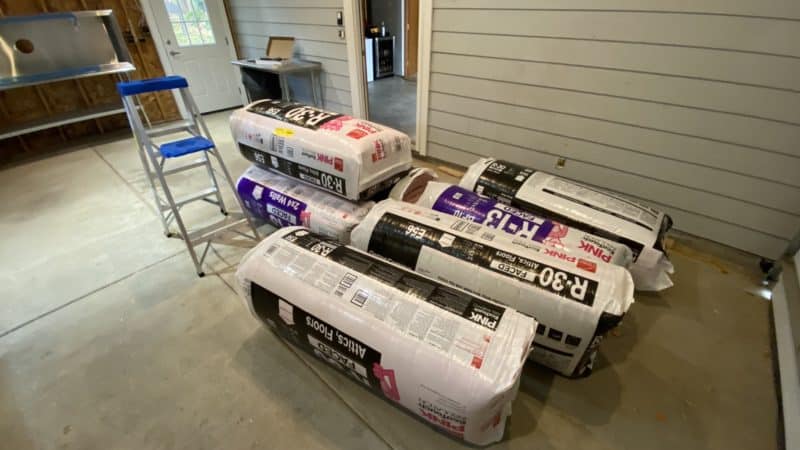
At the same time, the condensate hood I ordered from Fast Kitchen Hoods arrived. Before we could install the insulation, we had to figure out how to hang the hood.
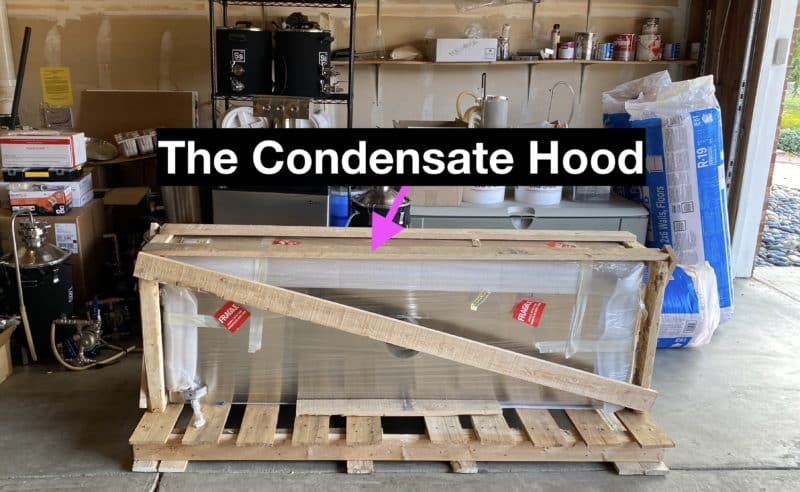
He and another guy came up with a plan for hanging the hood after insulation, drywall, painting, and plumbing were done. He added two 2x6s to the ceiling to install the hood with chains.
On Saturday, October 17th, he installed the insulation in the ceiling which he said was the hard part. Then, he came back on Monday the 19th to finish insulating all the walls.
The next day, he dropped off an invoice and some paint samples for me to choose from. Once the drywall is installed, he’ll paint the entire home brewery.
- Four packs of R-30 insulation for the ceiling: $105.56
- Four packs of R-19 insulation for the main garage walls framed with 2x6s: $128.95
- Four packs of R-30 insulation for brewery walls framed with 2x4s: $84.31
- Spray foam insulation for gaps and cracks: $4.11
- T50 Staples and fasteners: $18.90
- Labor: $1,370.00
- Total Cost: $1,711.83
Day 21: Drywall Installation
I hired a drywall company recommended by the guy who did the door and insulation. He came out to take measurements and emailed me a quote the same day. I accepted, and he ordered the drywall.
We scheduled the drywall installation for October 20th, the day after the insulation was complete. He said it would take about two days. But the drywall supplier was backed up and delivery got delayed. The drywall was delivered in the afternoon of October 20th.
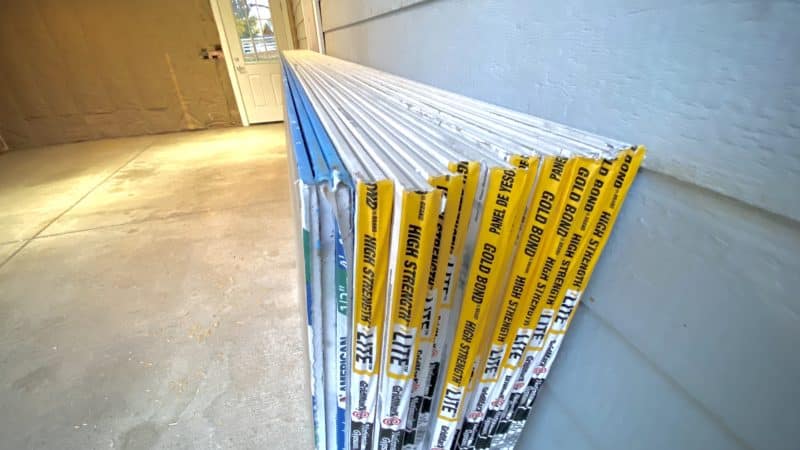
To compensate, he said he would drywall, tape, and spackle all in one day. That day was October 21st. They started at 8:00 AM and had the drywall hung by 10:00 AM. Taping and spackling wrapped up around 3:00 PM.
After they left for the day, I noticed the garage door opener kept jamming up. The next day, they sent someone back to look at it and they fixed it.
The following day (now three days for drywall), they came back again to fix mistakes and do a once-over sanding down a bunch of spots and touching up the mud work.
- Total Cost for supplies and labor: $2,650.00
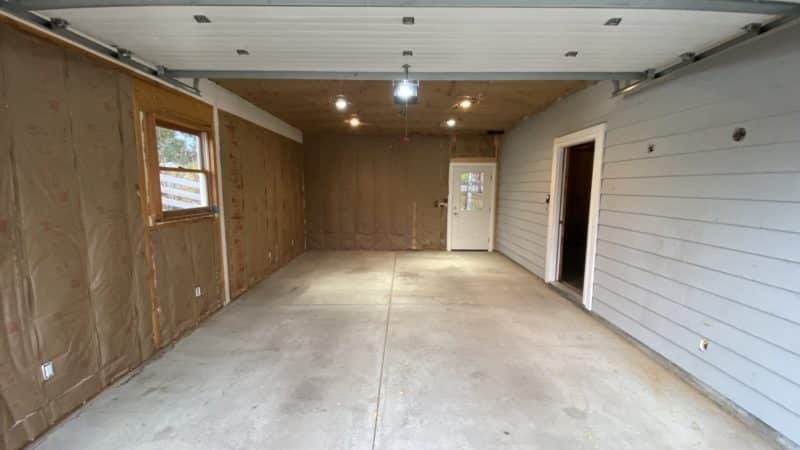
Day 23: Painting The Home Brewery
On Friday, October 23rd, right after the drywall guy left, the painter pulled in right away for the last time. The painter is the same guy who did the door and insulation.
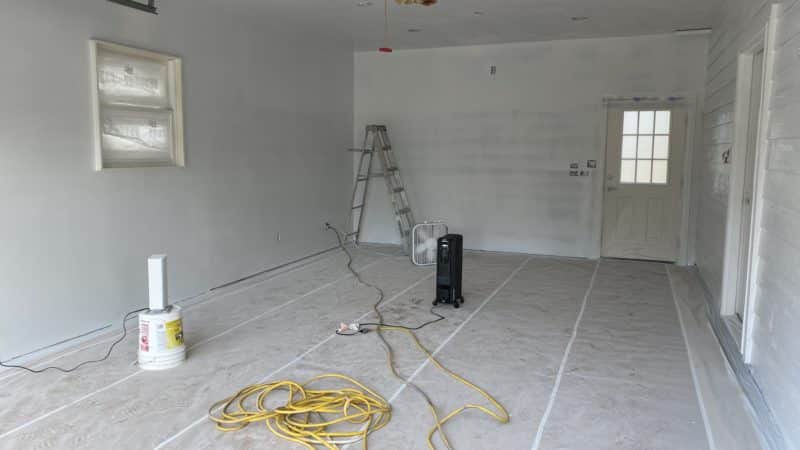
First, he had to put a primer coat on all the walls and ceiling. He used a paint sprayer, so most of the day was just laying down paper and wrapping parts that won’t be painted.
After the primer coat, we noticed a lot of mistakes on the drywall. You could see the screw holes. In Colorado, walls are textured so it’s not a concern. But we’re not texturing, so you can see everything.
Thankfully, the painter is extremely thorough with his work, and everything will look good in the end. But I’m a little disappointed in the drywall company I hired.
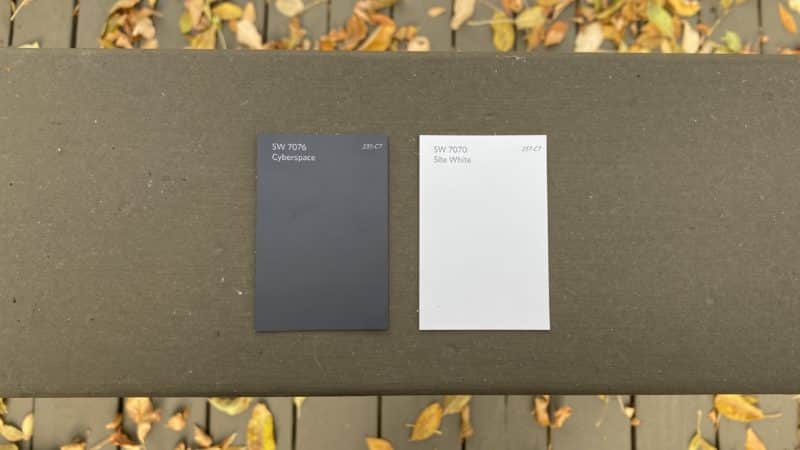
I chose to paint everything white except for the back wall. For that, I chose a gray color called Cyberspace (appropriately named). I thought it would contrast nicely with all the stainless steel.
I also had to choose a white since there are like 200 whites. I simply chose one of the recommended complimentary paints for Cyberspace called Site White (again, appropriately named).
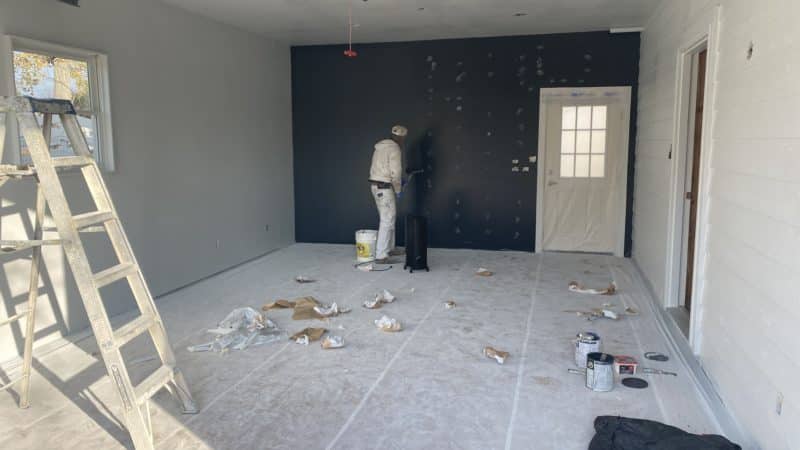
On October 24th, after a night of drying, the painter came to apply the final coats. Of course, he noticed even more drywall mistakes. It was fixed, but it took a few more coats than expected.
Once the paint thoroughly dried, we noticed a lot more visible screw holes and tape. My painter, my dad, and my girlfriend all advised me to reach out to the drywall company and complain about the job.
I was reluctant to do this because the ball was already rolling in the project. If he had to come out and fix anything, it was too late. But perhaps I could get some money back.
After talking with the owner, I felt stupid. This was the one part of the process that I didn’t research before getting into. He quoted me for a “level two” finish and that’s what he did. A level two finish is just one pass at taping and spackling, which makes sense for a garage that will not be painted.
H0wever, I mentioned several times that I was going to paint the garage. He felt terrible because he didn’t know I would paint the garage the way I did. And told me he should have done a better job at explaining.
I accepted this answer. It’s my fault, right? Since I don’t know anything about drywall, I couldn’t communicate it properly?
My dad thinks this is a bullshit answer since I mentioned I was going to be painting it. The drywall was not paint-ready. Here’s what I consider to be the worst spot.
At this point in the process, it was too late. I didn’t want to delay other workers just to make these fixes. Honestly, it pisses me off, but you have to try hard to notice the mistakes. Plus, my painter did an excellent job at hiding most of it.
On top of that, they also left a big mess on the floor.
The ball is already rolling, and there’s no turning back now. I’m determined to get this home brewery done. And if I ever want to fix this in the future, I know who NOT to call.
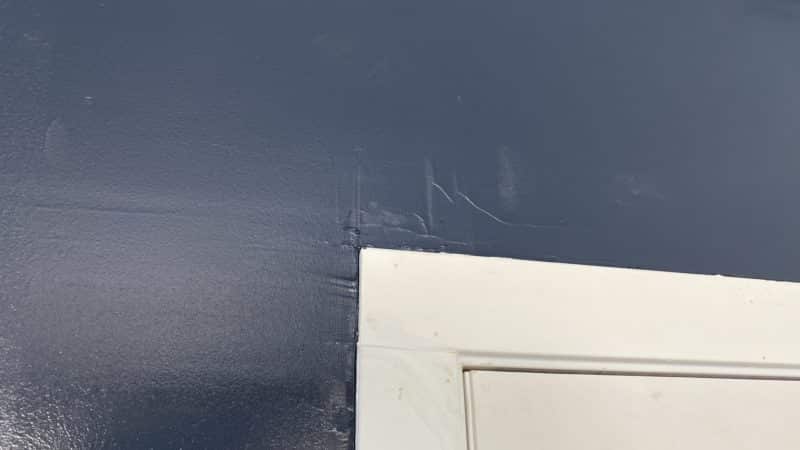
Another issue that popped up is paint got on the front of the garage door. My painter did a good job at keeping the garage door closed while he painted. But there was one time he had it open and did one last spray. Here’s what my garage door looks like now.
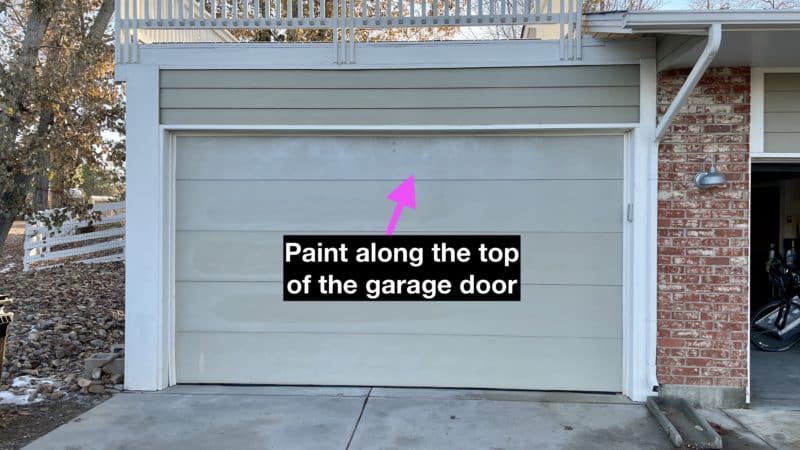
I have a can of the original paint for the door. My painter said he would fix it. He also apologized for the mistake and promised to paint the floor of the home brewery for FREE.
- Material and Labor: $1,379.89
Day 26: Finishing The Electrical Work
On October 26th, now that the drywall is up and painted, the electricians came to finish putting in outlets, switches, and lights.
I supplied my own Lutron Caséta Smart Dimmers to control the ceiling and wall lights above the bar. I also provided the lights. I got them from Target.com.
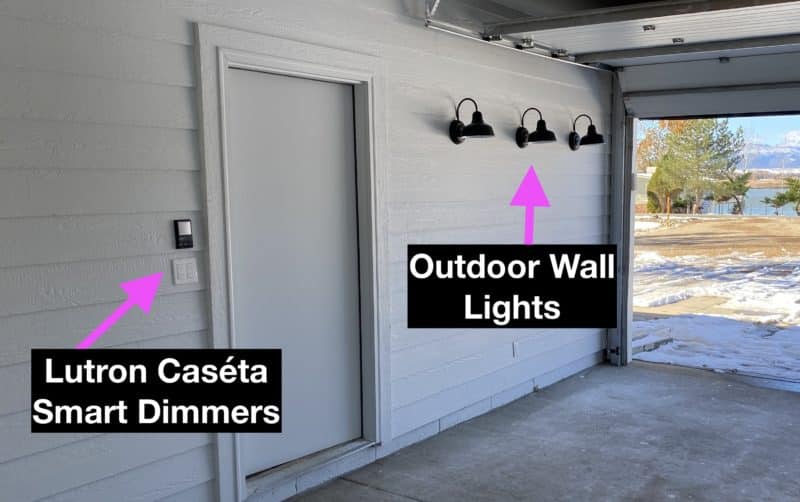
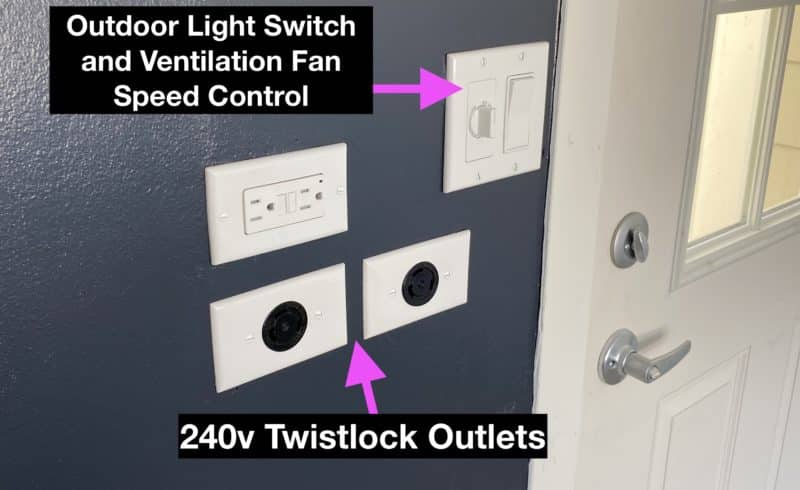
The outlets that control the whole brewing beer process are next to the back door and include two twist-lock 240v outlets and a regular 120v outlet. The Ss Brewtech 3V system will plug into this and hang it on the wall above it.
I already had the outlets from the last setup the electricians installed at my old place. I just needed to supply the fan speed controller which I bought off Amazon.
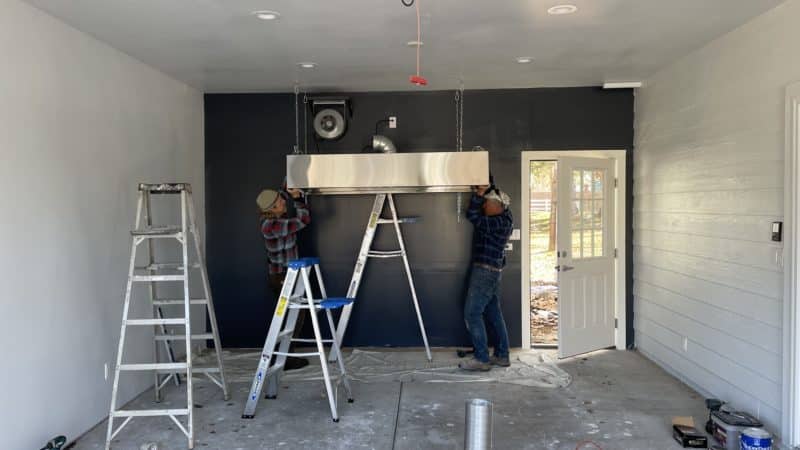
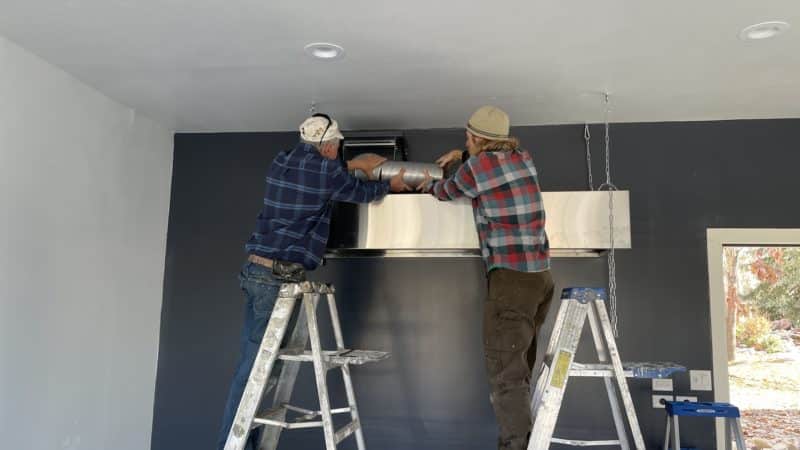
Day 29: Hanging The Condensate Hood
On October 29th, my main contractor and the guy who helped him install the door came back with a plan to hang the condensate hood. I mentioned before that my contactor installed some extra 2x6s for hood-hanging reinforcement. That part was easy.
The hard part was figuring out how to mount the 600 CFM ventilation fan. I bought from HomeDepot.com the fan based on a recommendation from TheElectricBrewery.com. It’s a Vortex 6-inch inline fan that came with mounting brackets.
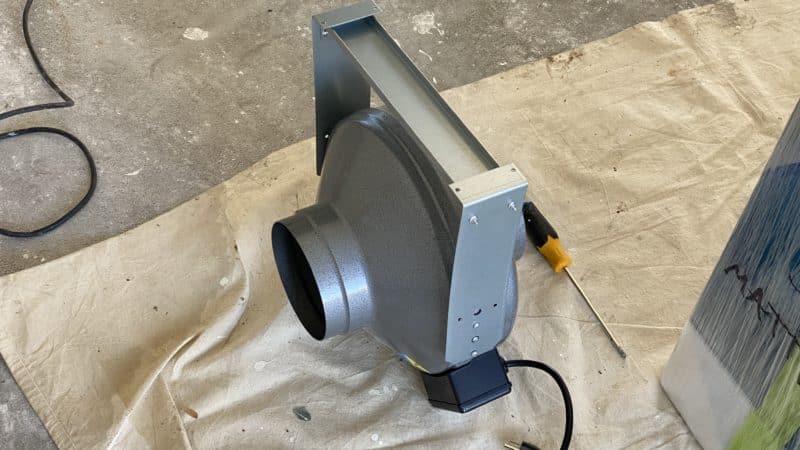
The plan was to build a small shelf for the fan to sit on against the wall to vent outside. Then we can run ductwork from the fan mounted on the wall to the top of the condensate hood. But we had to be careful not to block the path of the sink drain and water lines that would be installed the following day on the ceiling.
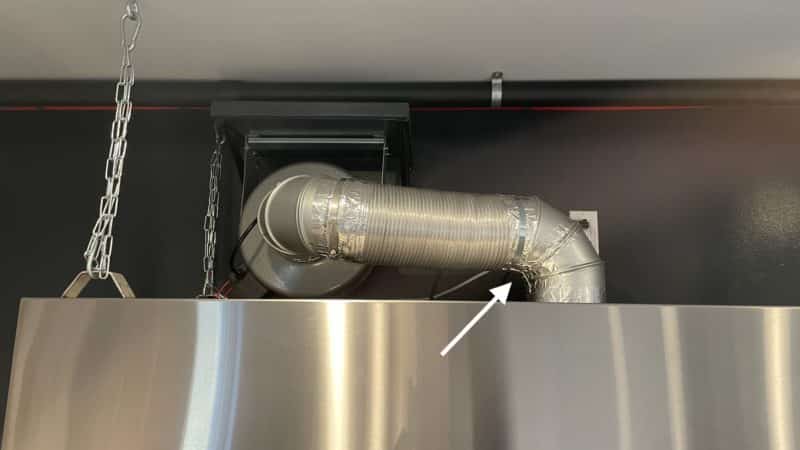
So to create a cleaner path for both the ductwork and sink lines, I suggested we hang the fan from the shelf instead of it sitting on top. Here’s what that looks like.
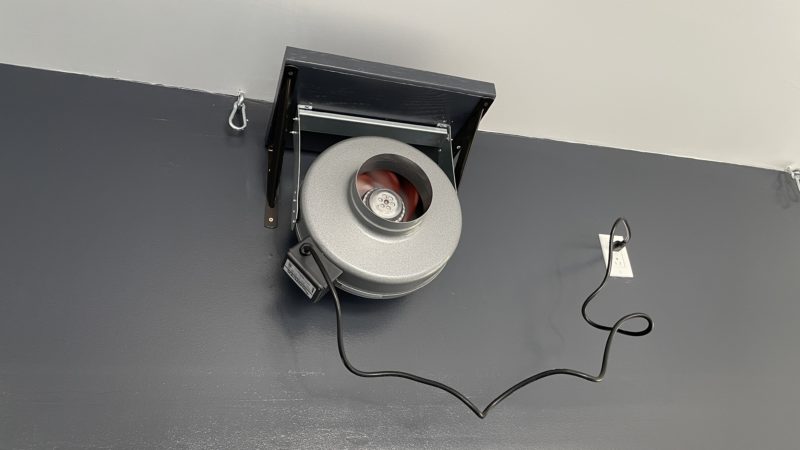
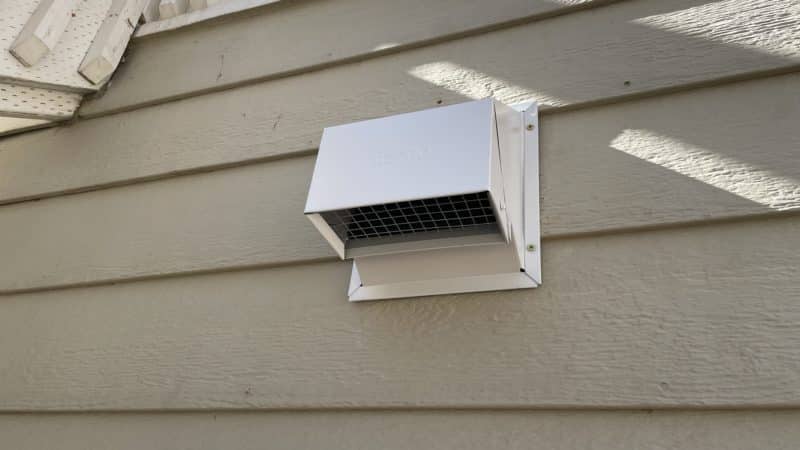
A six-inch hole was cut into the wall and vented outside. We added an exhaust hood which includes a flap inside to open only when air is blowing out (and doesn’t let outside air in). And it has a built-in cage to keep critters out.
Then, the hood was hung from the ceiling with chains so that we could adjust the height once it was up in place. And we added flexible ductwork for the same reason.
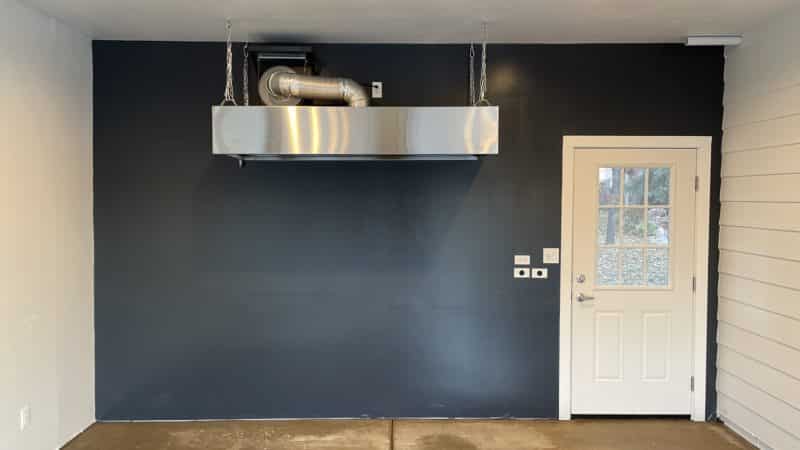
Once this was done, I tested the hood for leaks by boiling 7 gallons of water for 60 minutes with the fan at max speed. I wanted to see where the steam condensation would fall. Only a couple of drops landed on the table.
However, there was a leak in the first elbow in the ductwork off the hood. There’s a gap between the collar on the hood and the elbow where water collects and runs down on top of the hood. I think some foil tape on the inside of the elbow should fix that.
- Two 10-foot 2x6s for hanging the hood: $14.72
- Condensate Hood from Fast Kitchen Hoods: $1,369.93
- Vortex 6 in. Powerfan Inline Duct Fan: $180.12
- Parts and Labor: $1,322.59
- Total Costs: $2,887.36
Day 30: Finish Plumbing The Sink and Pot Filler
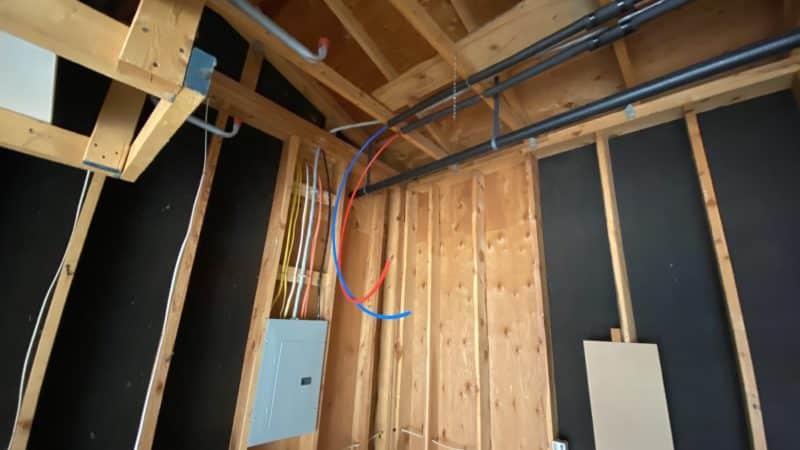
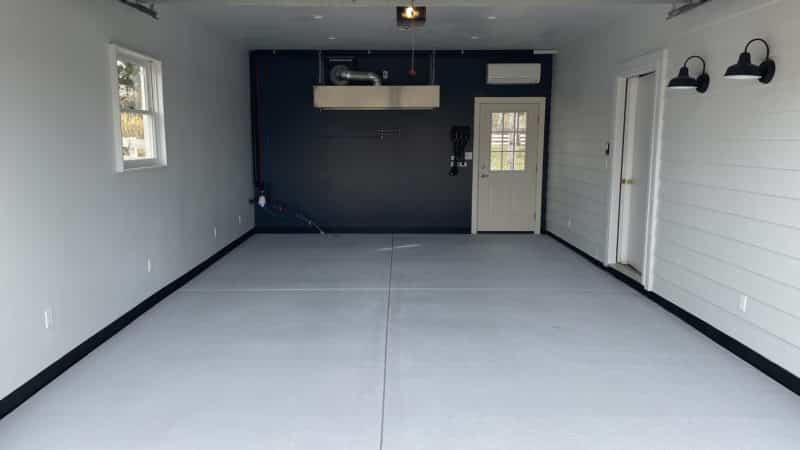
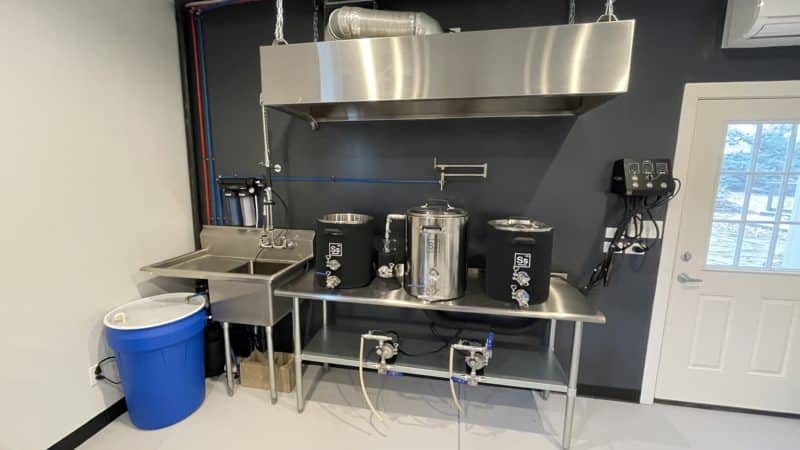
On October 30th, the plumber came back to finish installing the sink. He ran a drain (black PVC), hot water, and cold water lines (red and blue PEX) across the top of the roof and down the left corner of the brewery where the sink went.
![]()
You can see from the photo it matches exactly what I laid out earlier in this post. However, I was disappointed to see the red and blue PEX lines. I was hoping they’d be wrapped or something.
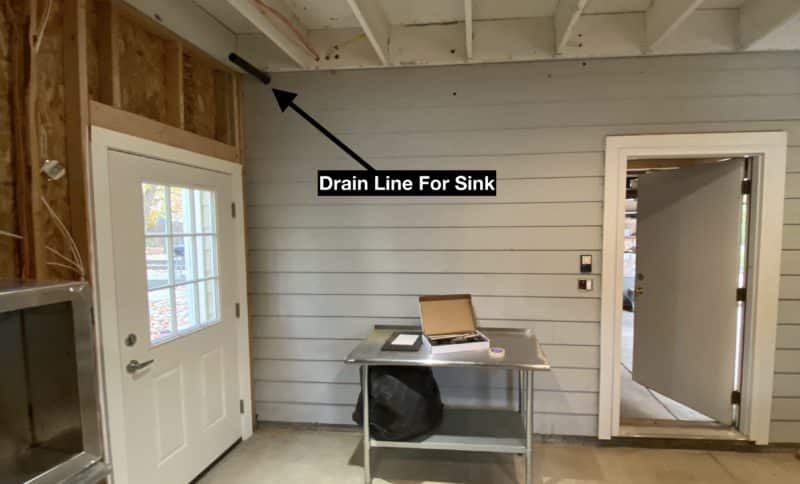
Also, the painter sprayed the black drain pipe that was initially run and I was hoping the plumbing would replace the line. Instead, he just continued so you could still see the white tube.
This is a little annoying, but I didn’t catch it in time. He already had the drainpipe run. And I didn’t communicate what I wanted to see in the final product.
While it doesn’t look perfect, it works. I couldn’t have done this myself. I’ll embrace the industrial look. I added some of the brewing equipment to get a sense of the final design.
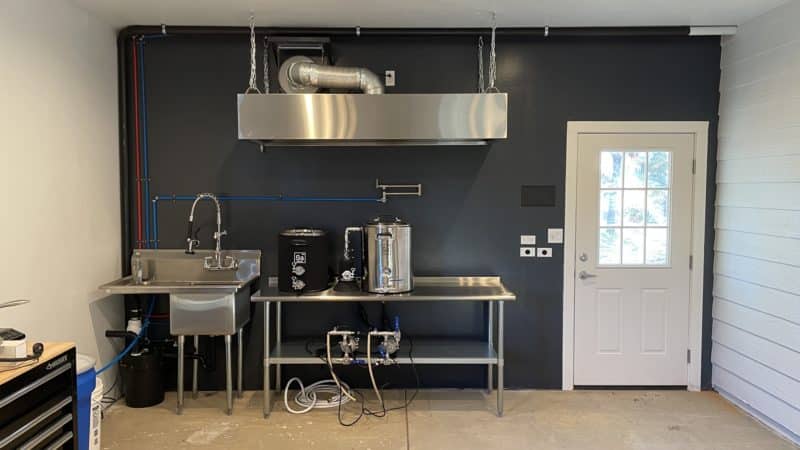
He also added another line off the cold water for me to hook up to the RO system. That will fill the reservoir and the discharge will just drain into the sink for now. Then there’s just a PEX line running from the pot filler to underneath the sink where I’ll install the pump. Hooking this up will be in another section.
Later that night, after the sink was installed, I noticed a leak coming from the back where the hot water line attaches to the sink. I had to call to get someone out to fix it.
Day 31: Building The Equipment and Storage Area
On October 31st (Halloween) I bought two heavy-duty wire shelves from Lowes and created storage for equipment and ingredients including grain and hops.
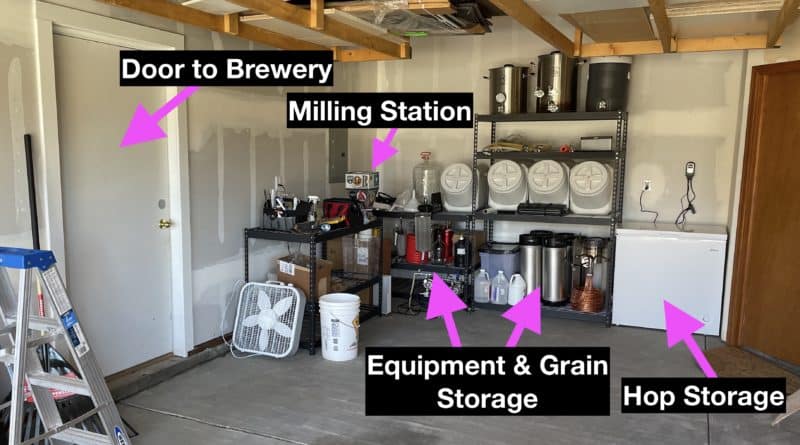
Currently, it’s a little messy because I still can’t move equipment into the brewery until the floors are painted. That’s the very last step of the process.
I was able to create a tall shelve for grain and equipment, a short shelf for more equipment, and another short shelf for milling grains. I can get into that later once it’s thoroughly cleaned up.
And the chest freezer is for hop storage and other food. Even frozen fruit for future beers!
- Two Edsal 24-in D x 48-in W x 72-in H 5-Tier Steel Utility Shelving Units: $218.00
- Midea Chest Freezer, 7.0 Cubic Feet: $420.00
- Total Cost: $638.00
Day 33: Installing The Heating and Air Conditioning Unit
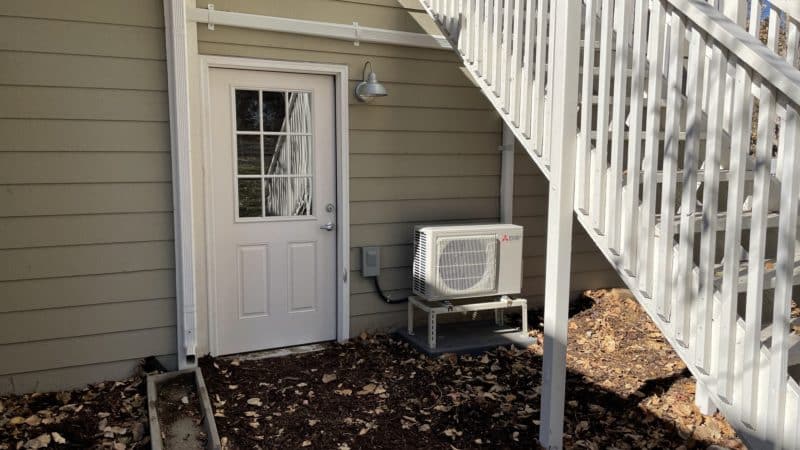
On November 2nd, the HVAC company came out to install a Mitsubishi mini-split to heat and cool the space. This was a Mitsubishi MSZ-GL 15,000 BTU wall-mounted single-zone heat pump that was installed above the new back door of the brewery.
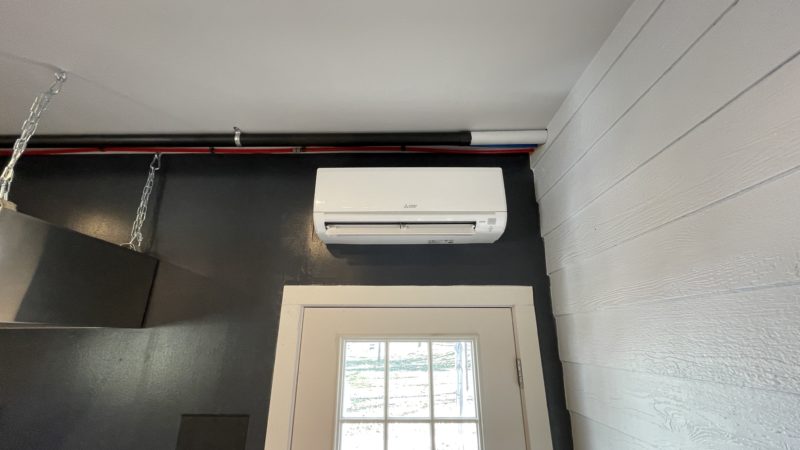
Refrigerant and exhaust lines run out the back right side and to a condenser that sits a foot off the ground on a platform. I had them install the condenser underneath the stairs to the roof deck for added protection.
The reason it sits off the ground that high is because of snow.
This installation only took about three hours total, and now the brewery has heating and cooling capabilities. This was one of the most expensive pieces of the home brewery setup.
It allows me to control the room’s ambient temperature, which will be great for brewing beer recipes consistently.
Total cost with parts and labor: $5,433.10
Day 36: Painting The Concrete Floor and Adding Trim
The painter said he would paint the floor and do the trim work for free since he accidentally painted the front of the garage door. Which he fixed by repainting the door.
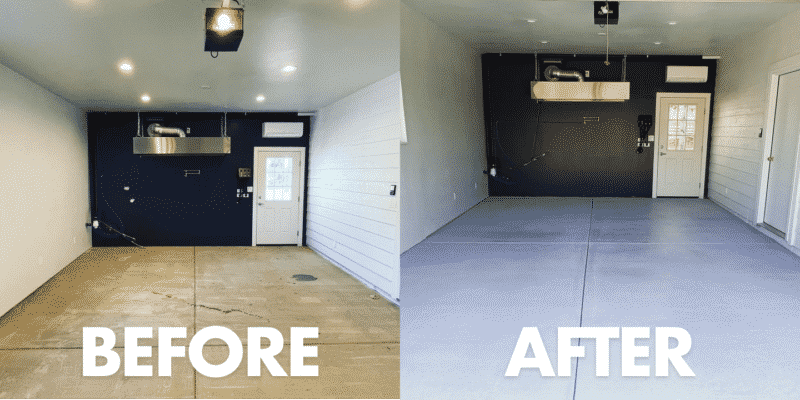
He applied the first coat on Thursday, November 5th. This was a thinned-out coat to help penetrate the concrete. On Friday, November 6th, he applied the final coat of Hot Trax.
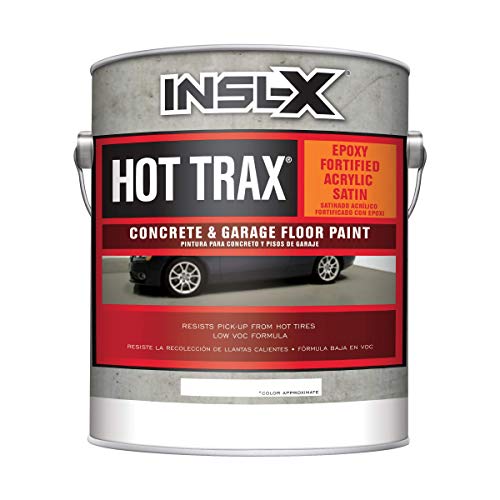
This was used the paint the concrete floor of the home brewery. I chose the silver gray color. It was highly recommended by the painter and other people online.
The day after that (Saturday, November 7th), he came back to glue the rubber base cove trim around the home brewery.
Day 37: Reinstalling The Sink and Installing The RO System
Now, it was time for me to roll up my sleeves and attempt some DIY projects. I had to remove the sink for the painter to do the floors. I asked the plumber to make it so everything could be easily removed, knowing I’d have to do this later. But he hard plumbed the ventilation pipe for the Drainosaur.
So I had to cut the pipe and install a rubber connector (yes, I did this myself!). No big deal. This made it easier to reinstall once the floors were dry.
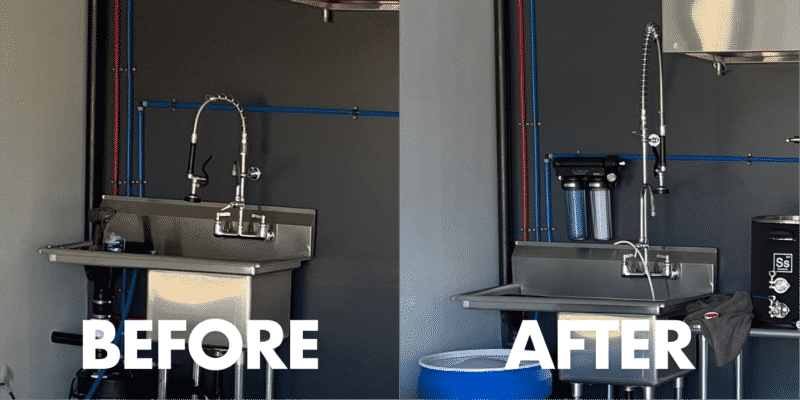
I also took this time to hook up the RO system. I screwed it to the wall using one stud and one drywall anchor.
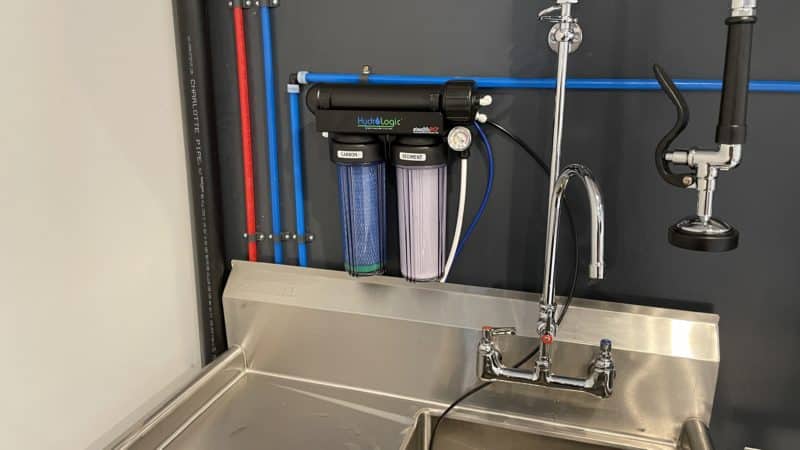
The white hose is the feed line where water is fed into the system. The black line is the waste hose that just lays in the sink to drain. And the blue hose goes down to the reservoir using a float valve to control how much it fills up.
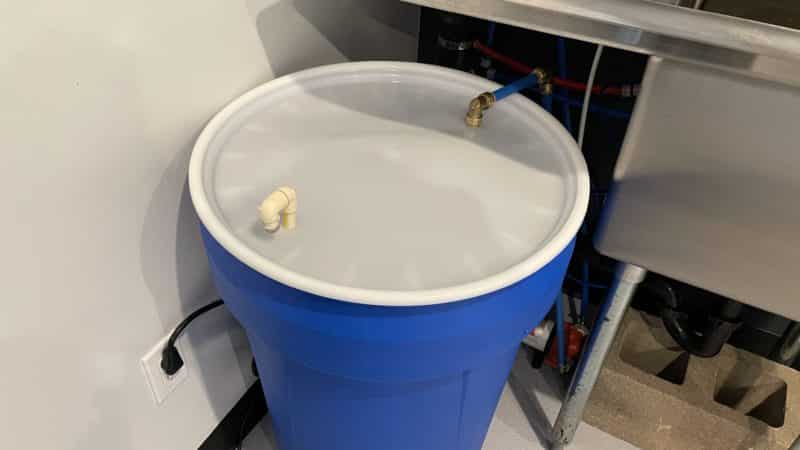
The little white elbow sticking out of the reservoir is a vent made with CPVC. The blue PEX hose acts as a giant straw that comes out of the reservoir, into the pump on the floor, and goes over to the pot filler.
I had to buy many tools and supplies from Lowes to complete the task. But in the end, it only took me an hour, thanks to Brian’s hard work and video editing.
Day 38: Setting Up The Electric Homebrew System
Finally, I started moving in and setting up my Ss Brewtech 3v system under the hood.
I tied up the cables using black zip ties and wrapped everything in some black pipe wrap for better cable management.
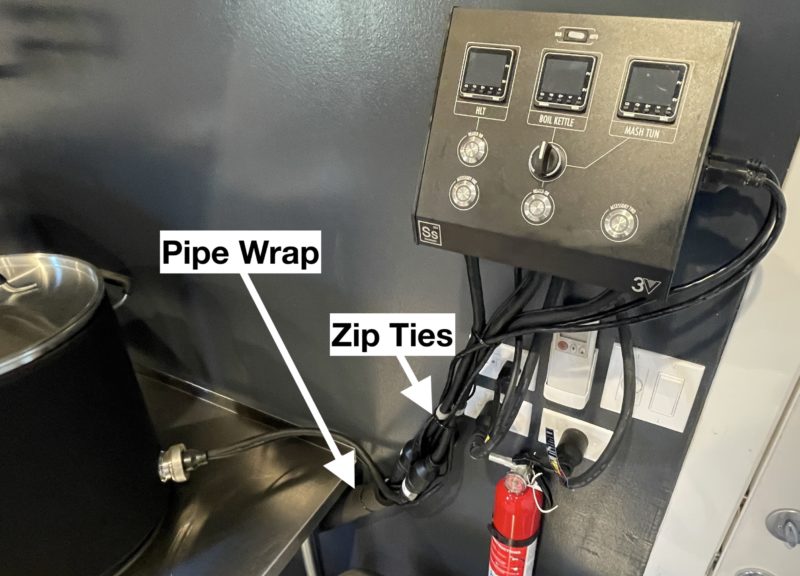
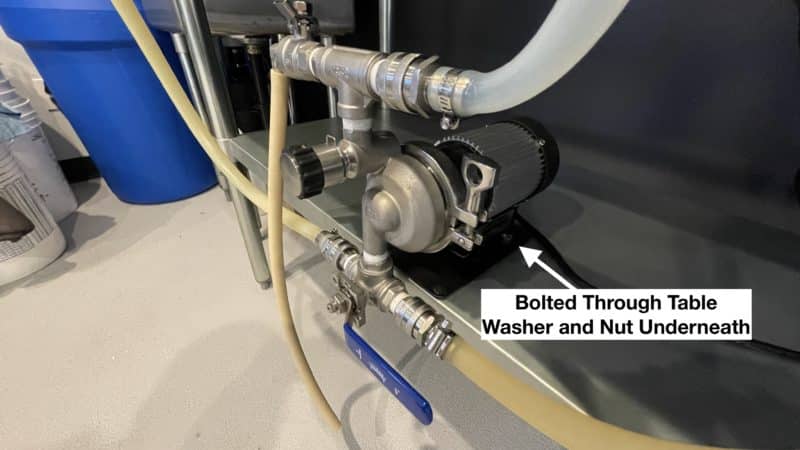
I drilled holes in the bottom self for the pumps and secured them using nuts and bolts. Since the pumps are front-heavy, this helps keep them from falling off the shelf. And easier to move valves with just one hand.
Day 39: Adding Shelves To Preparation Station and Installing Fridges
When I finished the brewery, I realized that I didn’t have any place to store all my minor parts like tri-clamps, racking equipment, siphon hoses, sparge arm, airlocks, bottle caps, bottle brush, bottle capper, extra spigots, etc. So I bought a workbench that had drawers for storage.
Thankfully, the house came with a bunch of Ikea shelves that matched the new workbench. I removed them from the basement and installed some of them in the brewery above the preparation station.
The workbench is equipped with an iPad Pro as the home brewery computer with the BrewFather app installed, a few brewing scales, a digital refractometer, a stir plate, and an induction burner to make yeast starters and decoctions. The white HomePod is for music and controlling the brewery lights.
The stainless steel table I’m using as a canning line includes a CO2 tank for purging cans and growlers. It also doubles as the gas line for supplying carbonation in my kegerator. I rarely bottle my homebrew using a bottling bucket because it introduces too much oxygen in the process.
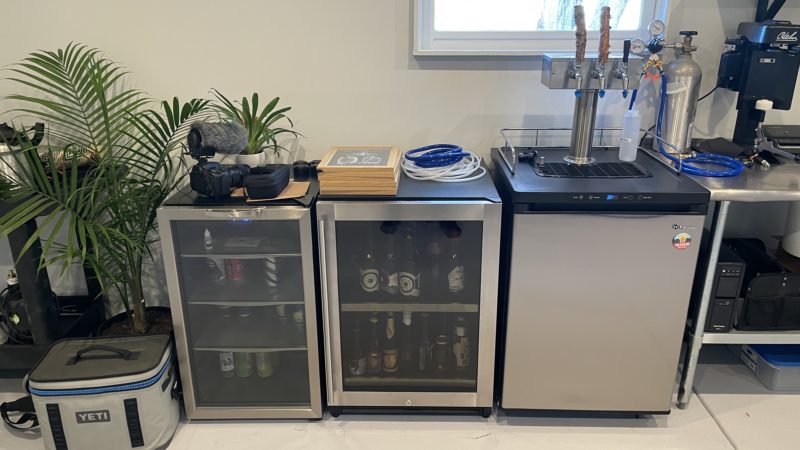
It also has a vacuum sealer for hop storage. Next are the 3-tap kegerator, the bomber bottle fridge, and the beer can fridge.
Day 40: Wet Testing The Home Brewery Setup and Fixing Hood Leaks
It was finally time to run water through the system to make sure every works and there are no leaks. And while there were no leaks in the kettles and pumps, there were a few leaks in the hood.
I did a water boil for a full hour to check where the condensate would fall around the hood. Turns out condensation was leaking at the ventilation fan and the 90-degree turn in the ductwork.
Upon further research, I found that the fan leaks, and I’m not the only one with the issue. Kal from TheElectricBrewery.com mentions this in a forum post.
So I bought some waterproof foil tape and sealed the inside and outside of the ductwork. I also sealed the screw hole in the electrical box on the fan.
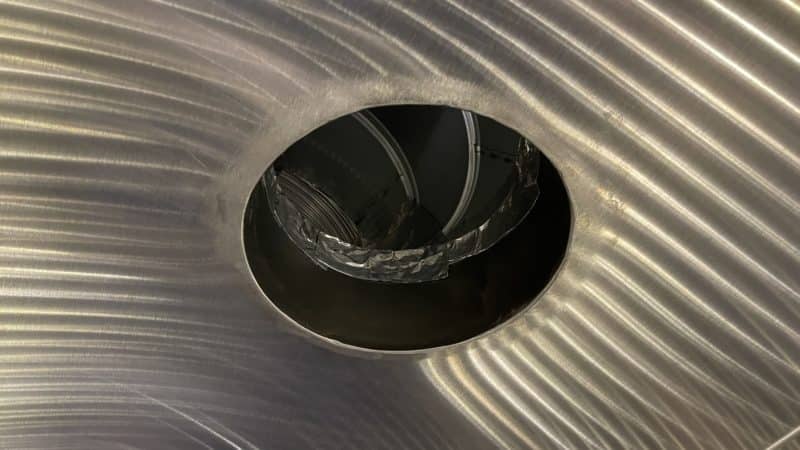
Thankfully, after another hour of boiling 7 gallons of water, no leaks were found. There was less condensation. I believe I sealed up some air leaks in the process that helped the fan get better suction.
Also, I added lights in the hood with some waterproof rope lights.

This was the final step in the home brewery build. Now all I have to do is brew a beer! Let’s recap my mistakes and the next steps with the brewery.
Mistakes I Made Building The Home Brewery
After 40 days of non-stop contractors and building work happening, I’ve had time to reflect on my mistakes, regrets, and things I would have done differently with the process. But in the end, I’m thrilled with the final product. There are just a few things I want to point out.
I Should Have Waited to Start the Home Brewery Project
We just moved into this brand new house and I got very overwhelmed with all the other projects we had going on at the same time. In hindsight, I would have gotten settled in the house and then taken my time building the brewery.
Also, I could have tested my skills on other less critical projects around the house. And truthfully, I regret not doing some things myself like painting, hanging the hood, and some plumbing work.
I Should Have Had Better Plans and Been More Stern with Contractors
The plans I got from my dad were good but not detailed enough to hand to contractors. I should have been more detailed with my drawings. I think it would have been better for the contractors.
And I wasn’t as stern as I should have been. For example, there were some aesthetic choices, like the white pipe and other plumbing visuals. But I was too embarrassed to make the contractors do what I wanted after they had already finished the work.
I was more concerned about getting things done on time anyway. That said, all of the work was great, and it’s really the only design choice that I made at the moment. So it’s no one’s fault but my own.
I Should Have Researched Drywall Finishes
The one part I thought was taken care of was drywall. My dad assured me it was an easy job. And it was. But the contractor wasn’t clear on the types of finishes he was pitching me, and I didn’t research anything.
I got a level two finish when I should have gotten a level 3. I wasn’t clear with the contractor that the walls would be painted. Although, I’m pretty sure I mentioned it several times.
He assumed it was a garage, I thought it would be a nice brewery, and when we painted, you could see all the screw holes and tape. It just pissed me off.
Even though my dad and the other contractors think it wasn’t my fault and the drywall company should have known better. Let’s just say it’s a hard lesson learned. And it can be fixed in the future.
I Bought The Wrong Faucet Size
This one is minor, but I had to buy a new faucet ($200) because it wasn’t large enough to clean my big kettles. I had just bought whatever Kal recommended on TheElectricBrewery.com.
I didn’t consider that I bought a different sink than him. Plus, when I looked at newer photos, he had a more oversized faucet. Oh well.
Home Brewery Setup Updates: 2021 Edition
I’ve made a lot of upgrades and improvements to my home brewery setup since I wrote this article. And I would like to share some of the things I’ve done with the space on top of making great beers.
Soundproofing and Filming More Videos
I added acoustic panels from Acoustimac.com to reduce the echo so I can start making videos in the brewery that sound amazing.
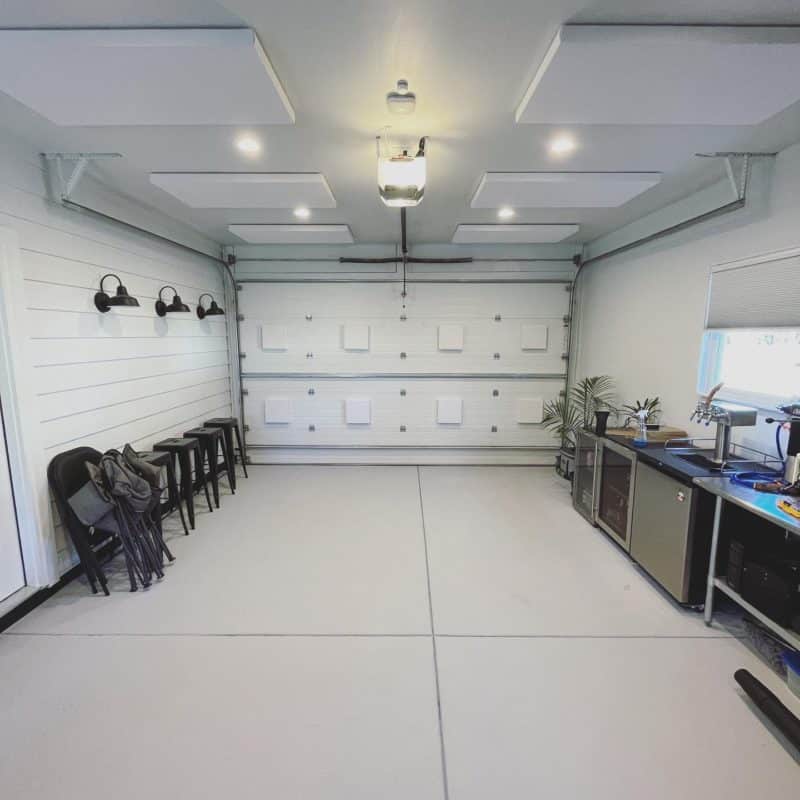
I’m doubling down on creating YouTube videos. I love watching homebrewing videos, but I wish people made more videos as BrewingTV did back in the day. So I’m taking the challenge into my own hands.
The first full all-grain brewing grain-to-glass video I made in the brewery was a New England IPA. Here’s the video.
I also filmed video lessons for my first course called, Level Up All Grain. The main goal of this course is to help you take your homebrewing skills to the next level. It covers advanced all-grain homebrewing techniques like water chemistry, yeast health, mashing, fermentation temperature, dry-hopping, and zero-oxygen packaging.
Building The Taproom
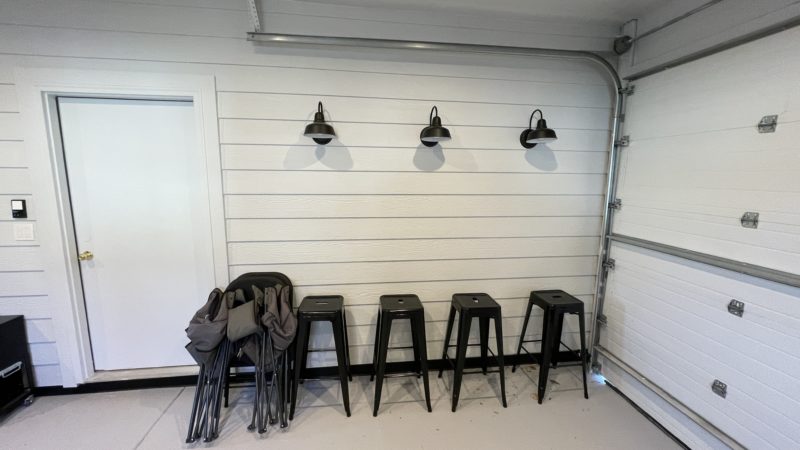
My original plan was to create a bar against the wall in the front half of the brewery. It’s why I had the lights installed and bought some stools. But as I started spending time in the brewery with friends, I was craving a space to fully relax instead of just leaning against a bar on an uncomfortable metal stool.
So I kept my eyes open for some outdoor furniture I thought would look good in the space. And I found the perfect set at a local AT HOME store.

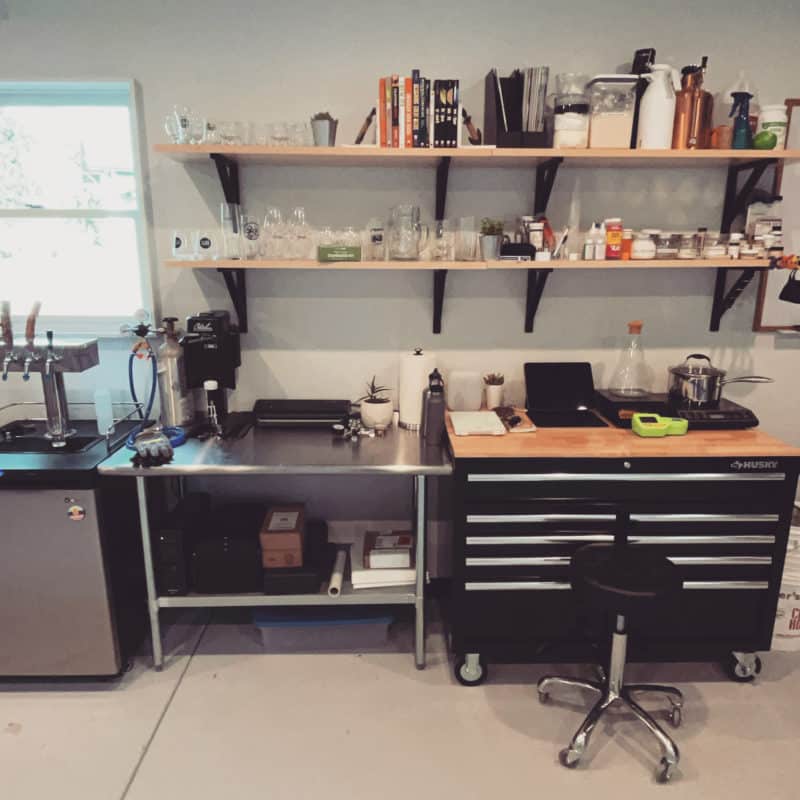
Condensing The Preparation Station
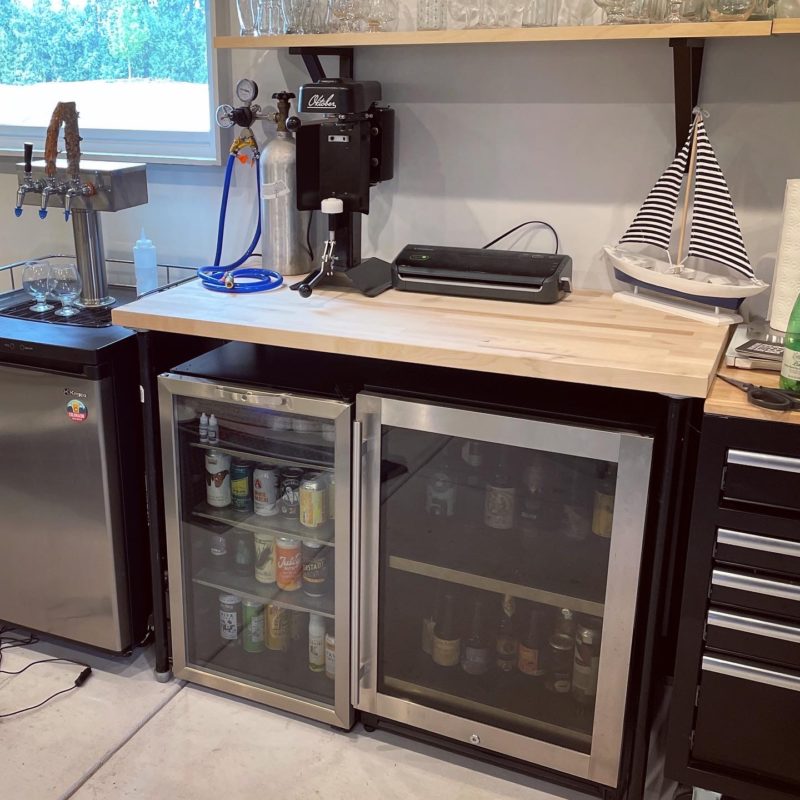
I wanted to utilize the space in the prep area better. So I got rid of my stainless steel prep table and built a wood table that would be high enough to store my can and bottle fridges underneath. I couldn’t find anything online, so I went to Home Depot and bought a 5-foot piece of butcher’s block and some gas piping to create this new table.
Expanding The Taproom
Condensing the prep area gave me enough room to expand the taproom by adding a massive 6-tap keezer to the space. This gives me a total of 9 taps to serve from.
I researched and built my keezer using a 15-cubic foot chest freezer complete with a glass rinser and LED lights. I even painted it black. Here’s a video and article about the build.
Improving The Cleaning Area with Pegboard Organizer
In 2022, I upgraded the area next to the sink to keep all my cleaning supplies, hoses, and other beer-making gear I need close by. I installed this pegboard system thanks to Ryan Carter on Instagram and YouTube.
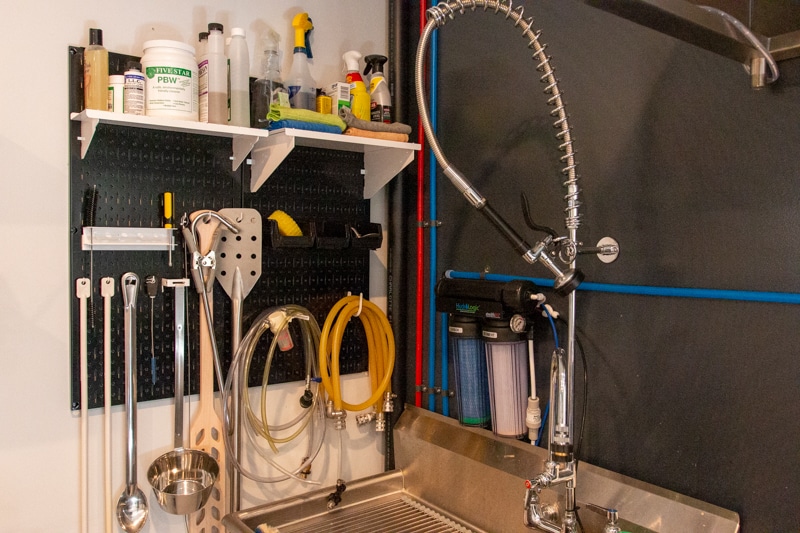
I like this pegboard system because the hooks stay in place without adding screws. You can buy this exact system with all the hooks, shelves, and organization bins if you want.

This is the best pegboard system I found. I've tried two other brands/models, and this is by far superior in every way. Quality build, custom hooks that don't fall out, and it looks cool!
So the goal is to brew my own beer as much as I can and dial in the process to make better beer consistently. This includes lagers, pale ales, sours, you name it! I’ll be documenting all of this on this site and the new YouTube channel.
I hope you subscribe and follow along. Please leave comments on things you’d like to see on the channel and the website.
Let’s brew!